5 from 92 votes
Chocolate Mirror Glaze
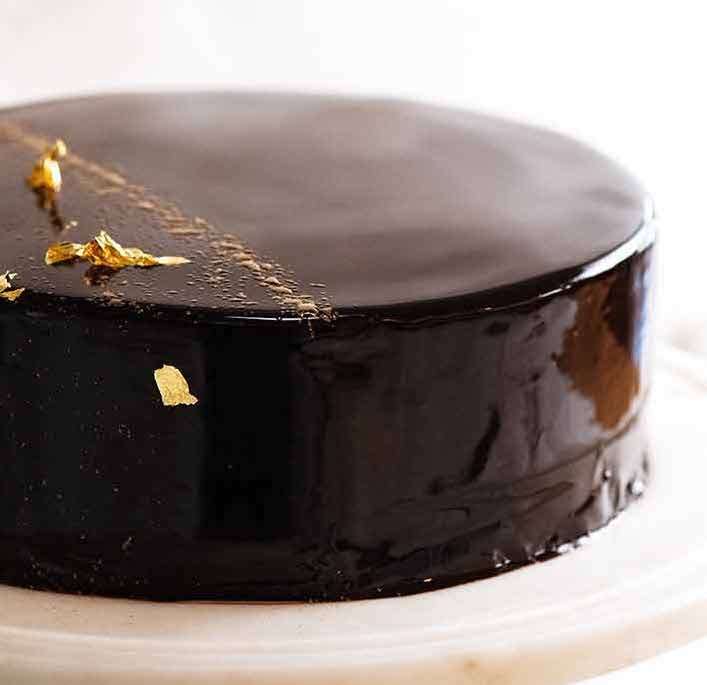
Chocolate Mirror Glaze is a shiny, smooth glaze made from cocoa, cream, sugar, and gelatin, poured over a two-layer chocolate cake coated in chocolate ganache. The glaze sets to a reflective finish, lending a glossy and elegant look to the cake, suitable for special occasions and visually impressive desserts.
Prep Time
1 hr
Cooling
5 hrs
Servings:
12
Calories:
645 kcal
Course:
Dessert, Cake
Cuisine:
French, American
Ingredients
- 1 x 20cm / 8" chocolate cake Note 1, 2 layers
- 2 batches dark chocolate ganache (Note 2)
Gelatine for glaze:
- 2 1/2 tbsp water (just cold tap water)
- 4 tsp gelatine powder (Note 3)
Mirror Glaze:
- 2/3 cup water
- 2/3 cup cream , pure / regular whipping cream, better than thickened/heavy cream (Note 4)
- 1 cup cocoa powder , unsweetened, sifted (preferably dutch processed, Note 5)
- 1 cup + 2 tbsp white sugar , caster/superfine (Note 6)
Decorating (optional, as pictured)
- Gold leaf optional decorations (Note 7, gold dust
Instructions
Cake and Ganache Frosting preparation:
- Refrigerate cake layers for at least 1 hour until well-chilled (for easier handling). Then trim cake to make it level and frost cake with chocolate ganache so it's smooth and level (follow the tutorial in this post: How to Frost Cakes Smoothly).
- After the ganache is smooth and level, refrigerate for at least 1 hour before coating with Mirror Glaze.
Cup of Yum
Make Mirror Glaze:
- Bloom gelatine: Place water in a small bowl. Then sprinkle gelatine across surface, mix just so all the powder is wet. Leave for 5 minutes - it will become like a rubber consistency. (This is called "blooming gelatine".)
- Whisk cocoa and water: Place cocoa and water in a medium saucepan then mix until virtually lump-free. It will be like a paste.
- Add cream and sugar: Add a splash of cream to cocoa mix and stir. It will loosen up. Add remaining cream and sugar, then GENTLY continue to mix to combine. Do not mix vigorously and do not use a whisk (Note 7).
- Bring glaze to boil: Turn stove onto medium high heat. As soon as it comes to the boil, remove from the stove.
- Dissolve gelatine: Add gelatine lump, then GENTLY stir until it dissolves and you have a smooth glossy glaze. (There may be some white foam, that's ok.)
Cool & Strain Mirror Glaze:
- First straining: Using a shallow bowl and small fine mesh strainer, strain the glaze into a bowl. Pour and position the strainer so the glaze falls the smallest distance possible. If you pour from a height, this creates bubbles = bad!
- Bubble check: Twist the bowl back and forth between your hands rapidly. This will make any bubbles rise and gather in the centre. If you see bubbles, see "Note 8: Bubble Troubleshooting".
- Cool glaze: Cover with cling wrap, pressing the cling wrap onto the surface of the glaze to prevent a skin from forming. Cool on the counter for 2 hours until it reaches 30°C/86°F. See Note 9 for overnight refrigeration.
- Second straining: Just before pouring over the cake, strain the glaze into a jug. As before, tilt the jug and strainer as you pour the glaze in to minimise the distance the glaze falls.
Glazing!
- Transfer cake to rack: Remove cake from fridge, transfer onto a rack. (See Note 9 for how I do it.) Place rack on a tray to catch excess glaze.
- Pour over mirror glaze: Starting at the centre of the cake, pour the glaze on, moving in an expanding spiral motion gradually towards the outer edge of the cake, to make the glaze spread across the surface and drape like curtain down the sides. For the most perfect surface, try to do it in one motion without breaking the pour. Pour with confidence in a thick stream rather than a thin drizzle (which might set too quick and leave drips).
- Ensure all sides are fully coated - if not, quickly do a little pour down the sides to coat the naked patches.
- Transfer cake to platter: Before the mirror glaze sets (takes ~10 minutes), move the cake to a cake platter (Note 9 again for my cake-shifting method).
- Fix blemishes - Use excess glaze on the tray and in the jug to fill gaps and tears. Then smooth over with a warmed palette knife (either lightly warm with a blow torch or dip into warm water and wipe). See video for demo.
How to Slice Cake Cleanly with Neat Layers:
- Fill a tall jug with warm tap water. Dip a knife in, then wipe dry. Make one slice into the cake.
- Clean knife, dip in warm water and dry again. Make your second cut to get your wedge. Pull wedge out and marvel at the perfect layers before continuing to cut more slices! See notes for storage.
Notes
- The chocolate cake used should have a tender texture yet be sturdy enough for handling the ganache and glaze.
- Prepare a double batch of dark chocolate ganache to ensure enough to frost and smooth the cake.
- Gelatin should be bloomed with cold water before adding to the glaze for proper setting.
- Use pure or regular whipping cream for the best texture; avoid light or low-fat creams.
- Avoid whisking the glaze vigorously to prevent bubbles which disrupt the smooth finish.
- Bubbles in the glaze can be removed by pricking individually or using a gentle blow torch surface pass.
- The glazed cake can be stored at room temperature below 22°C or refrigerated, and the mirror glaze maintains its shine for days.
- Leftover glaze can be strained and refrigerated or frozen for reuse if it remains clean.
Nutrition Information
Calories
645cal
(32%)
Carbohydrates
5g
(2%)
Protein
3g
(6%)
Fat
6g
(9%)
Saturated Fat
4g
(20%)
Polyunsaturated Fat
0.2g
(1%)
Monounsaturated Fat
2g
(10%)
Cholesterol
15mg
(5%)
Sodium
9mg
(0%)
Potassium
122mg
(3%)
Fiber
3g
(12%)
Sugar
1g
(2%)
Vitamin A
194IU
(4%)
Vitamin C
0.1mg
(0%)
Calcium
19mg
(2%)
Iron
1mg
(6%)
Nutrition Facts
Serving: 12 Serving
Amount Per Serving
Calories 645
% Daily Value*
| Calories | 645cal | 32% |
| Carbohydrates | 5g | 2% |
| Protein | 3g | 6% |
| Fat | 6g | 9% |
| Saturated Fat | 4g | 20% |
| Polyunsaturated Fat | 0.2g | 1% |
| Monounsaturated Fat | 2g | 10% |
| Cholesterol | 15mg | 5% |
| Sodium | 9mg | 0% |
| Potassium | 122mg | 3% |
| Fiber | 3g | 12% |
| Sugar | 1g | 2% |
| Vitamin A | 194IU | 4% |
| Vitamin C | 0.1mg | 0% |
| Calcium | 19mg | 2% |
| Iron | 1mg | 6% |
* Percent Daily Values are based on a 2,000 calorie diet.