4.7 from 167 votes
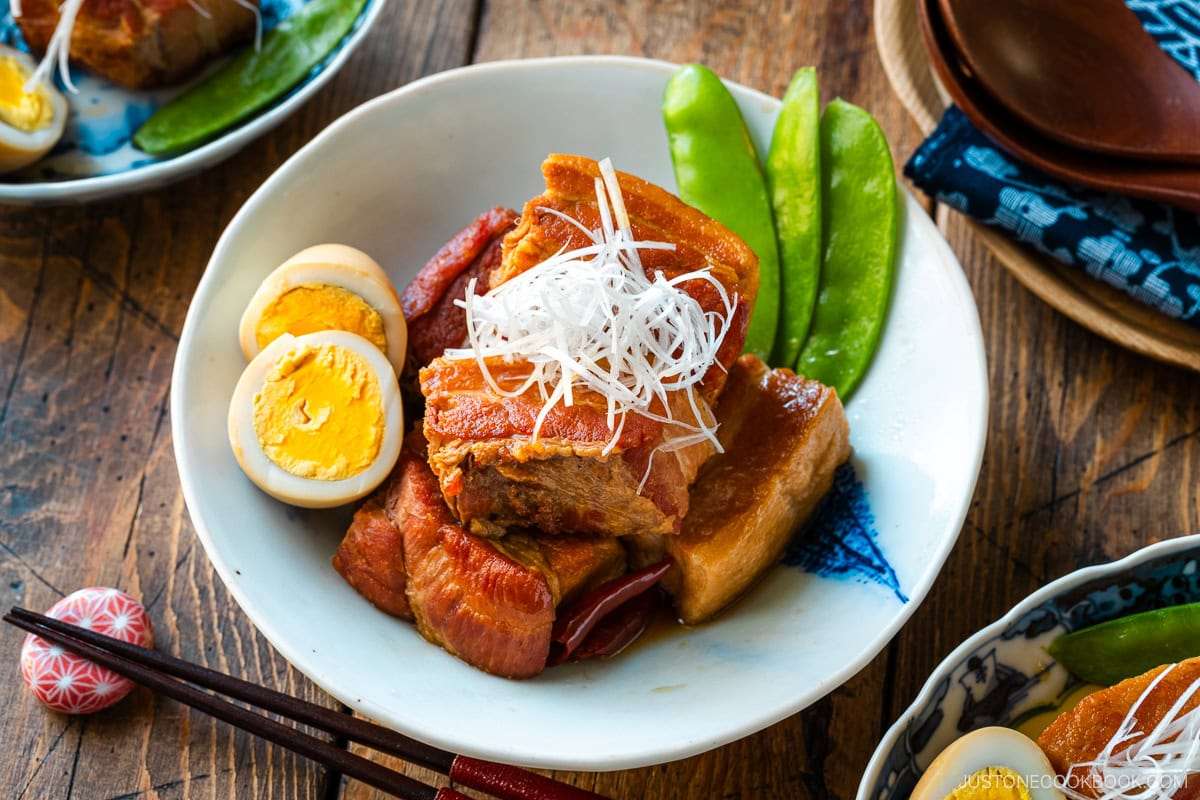
Kakuni (Japanese Braised Pork Belly)
Kakuni features tender pork belly slowly braised with aromatics like green onion and ginger in a seasoned dashi broth with sake, mirin, soy sauce, sugar, and optional chili. The pork is initially seared to render fat and develop flavor before simmering to a soft, melt-in-the-mouth texture. Simmered eggs may accompany the dish, absorbing the braising flavors. The slow cooking infuses the pork with a balanced savory-sweet profile, characteristic of this Japanese specialty.
Prep Time
15 mins
Cook Time
4 hrs 15 mins
Total Time
4 hrs 30 mins
Servings:
4
Calories:
703 kcal
Course:
Main Course
Cuisine:
Japanese
Ingredients
- 1 green onion or several green onions/scallions, aka Tokyo negi, naga negi, long green onion
- 1 knob ginger (2 inches, 5 cm; unpeeled; divided, for slow cooking and braising)
- 1⅔ lb pork belly (or up to 1¾ lb, 790 g for this batch of seasonings; skinless; ask your butcher to remove the skin)
- ½ Tbsp neutral oil (for searing)
- ¼ cup sake
- 4 egg optional; cold from the refrigerator, large, 50 g each, without shell
- 5 snap peas (optional, for garnish; or green beans)
For the Seasonings
- 1 dried red chili pepper (optional)
- 2½ cups dashi use standard Awase Dashi, dashi packet or powder, or Vegan Dashi, Japanese soup stock
- ¼ cup sake
- ¼ cup mirin
- ¼ cup sugar
- ¼ cup soy sauce
For Serving
- Japanese seven spice optional, to taste, aka shichimi togarashi
Instructions
- Gather all the ingredients. I made quick dashi using a dashi packet (it only takes 3 minutes). Leave the eggs in the refrigerator until ready to use.
Cup of Yum
To Prepare the Aromatics
- Cut 1 Tokyo negi (naga negi; long green onion) in half to separate the green and white parts. Cut the green part into 2-inch (5-cm) pieces. Set aside the white part to make Shiraga Negi later for garnish (see how in To Serve below).
- Cut 1 knob ginger (unpeeled) into thin slices. Divide; set aside half for slow-cooking the pork and the other half for braising.
To Sear the Pork Belly
- Cut 1⅔ lb pork belly strips into shorter blocks that will lie straight when placed in a large pot later (I use a 4 QT Staub). If your pork belly is already in smaller blocks, you don't need to cut it. To sear, heat a heavy skillet over medium-high heat. When it‘s hot, add ½ Tbsp neutral oil. Tip: Using the oil helps render the pork's fat faster.
- Place the pork belly fat side down in the hot skillet. (Do not overcrowd the pot. Sear in batches if you're doubling the recipe.) To prevent oil splatter, you can use a splatter screen. Tip: Searing the surface of the meat before boiling helps draw out excess fat and lock in the flavor.
- Sear the meat until all sides are nicely browned, about 2–3 minutes per side.
- Transfer the seared pork belly pieces to the large, heavy-bottomed pot. Lay them straight and in a single layer.
To Slow-Cook the Pork Belly (2½–3 hours)
- To the pot, add ¼ cup sake and enough water to cover the meat. To start off, I added 1.5 QT or 1.5 L water for a single batch of the recipe; however, if there's enough room in your pot, add 2 QT or 2 L of water.
- Add the green part of the negi and half of the sliced ginger (save the other half for braising later). Bring it to a boil over medium heat. Tip: Boiling the meat removes the excess fat and scum while keeping the meat juicy.
- Skim the scum and fat with a fine-mesh skimmer, and then reduce the heat to a simmer. Place an otoshibuta (drop lid) directly on top of the pork belly. You can buy an otoshibuta on Amazon or make one with aluminum foil following my post on How To Make Otoshibuta. Cook, uncovered, on a *gentle simmer*, for 3 hours. Leave off the pot lid so the unwanted odor goes away. Tip: I cannot emphasize enough that slow, gentle cooking is the key. If you cook on strong heat, the meat will become tough.
- When the liquid is running low, add more water or hot water (I added another 0.5 QT or 0.5 L) to the pot so the meat remains submerged at all times. Tip: Make sure the meat is not exposed, or else it will become dry.
To Prepare the Optional Eggs and Snap Peas
- Meanwhile, boil enough water in a medium saucepan so the eggs will be completely submerged when added. Remove 4 large eggs (50 g each w/o shell) from the refrigerator. Gently lower the cold eggs into the boiling water using a fine-mesh skimmer. Set a timer for 6½–7 minutes and soft-boil them on medium-low heat.
- As soon as the timer is up, transfer the eggs to a bowl of iced water to stop the cooking. Let them cool, peel them, and set aside.
- Bring a small amount of water in the same pot to a boil. Remove the tough strings from 5 snap peas and add them to the boiling water.
- Blanch them until tender, about 1½–2 minutes. Set aside until ready to serve.
To Braise the Pork Belly (1 hour)
- After cooking for 3 hours, remove the otoshibuta (drop lid) and check the meat for tenderness. Tip: For really tender pork belly, cook for at least 3 hours and add more water as needed to keep the meat fully submerged.
- Remove the pork belly to a tray or plate. If you'd like, you can strain and reserve the cooking liquid as a stock for other recipes. Let the liquid sit in the fridge and skim off any fat that floats to the top before using.
- Gently cut the pork belly into 2-inch (2.5-cm) pieces. The pork should be very tender by now, so handle carefully. Place the pieces in a single layer in a medium, heavy-bottomed pot (I use a 2.75 QT Staub). Tip: Use a medium pot for a tighter fit so the seasonings will completely cover the meat. If you use the same large pot as before, you may need to increase the amount of seasonings to cover the meat.
- Cut 1 dried red chili pepper (optional) in half and discard the seeds. If you like it spicy, you can include the seeds.
- Add 2½ cups dashi (Japanese soup stock), ¼ cup sake, ¼ cup mirin, ¼ cup sugar, and the dried red chili pepper.
- Add the rest of the ginger slices and place the otoshibuta (drop lid) on top. Do not cover with the pot's lid. Start cooking on medium heat. Once simmering, reduce the heat to low or medium low and cook, uncovered, on a gentle simmer. Set a timer for 1 hour.
- At the halfway point (30 minutes), add ¼ cup soy sauce. Tip: We add the soy sauce later on to keep the meat from cooking in it a long time and becoming salty.
- Add the peeled soft-boiled eggs to the pot. Place the otoshibuta (drop lid) on the meat and continue simmering, uncovered, for the remaining 30 minutes.
- If the cooking liquid gets low, reduce the heat to low (your stove's lowest setting). Occasionally, shake the pot to coat the meat and eggs with the braising liquid. Make sure there‘s enough liquid in the pot so the pork and eggs don‘t burn. It should be plenty of liquid; if your liquid is low, you might have been cooking on higher heat. After braising for 1 hour, turn off the heat. It's now ready to serve.
To Serve
- Use the white part of 1 Tokyo negi (naga negi; long green onion) to make shiraga negi. First, cut the white part into pieces that are 3 inches (7.6 cm) long. Then, make a lengthwise incision to remove the soft green core (save it for another use). Stack the outer layers, holding them flat against the cutting board, and slice lengthwise into very thin julienned strips. Soak in a bowl of iced water for 5–10 minutes to remove the bitterness, and drain well. Tip: For step-by-step photos, see my tutorial on How To Make Shiraga Negi.
- Serve the Kakuni, eggs, and snap peas in individual bowls. Drizzle with some braising liquid and garnish on top with shiraga negi. Season with optional shichimi togarashi (Japanese seven spice) for a spicy kick.
To Develop More Flavor (optional)
- For a more flavorful Kakuni, wait several hours before serving. Kakuni tastes best when gradually cooled in the braising liquid, allowing the food to absorb more flavors. Gently reheat thoroughly and serve. If you prefer a less oily Kakuni, serve it the next day. Let it cool completely, then refrigerate the pork belly in its braising liquid overnight. The next day, remove and discard the solidified fat. Gently reheat the Kakuni thoroughly and serve.
To Store
- You can keep the leftovers in an airtight container and store in the refrigerator for up to 3–4 days and in the freezer for a month.
Nutrition Information
Calories
703kcal
(35%)
Carbohydrates
10g
(3%)
Protein
16g
(32%)
Fat
64g
(98%)
Saturated Fat
23g
(115%)
Polyunsaturated Fat
7g
(41%)
Monounsaturated Fat
29g
(145%)
Trans Fat
1g
(50%)
Cholesterol
221mg
(74%)
Sodium
575mg
(24%)
Potassium
324mg
(7%)
Fiber
1g
(4%)
Sugar
8g
(16%)
Vitamin A
397IU
(8%)
Vitamin C
3mg
(3%)
Calcium
39mg
(4%)
Iron
2mg
(11%)
Nutrition Facts
Serving: 4 Serving
Amount Per Serving
Calories 703
% Daily Value*
| Calories | 703kcal | 35% |
| Carbohydrates | 10g | 3% |
| Protein | 16g | 32% |
| Fat | 64g | 98% |
| Saturated Fat | 23g | 115% |
| Polyunsaturated Fat | 7g | 41% |
| Monounsaturated Fat | 29g | 145% |
| Trans Fat | 1g | 50% |
| Cholesterol | 221mg | 74% |
| Sodium | 575mg | 24% |
| Potassium | 324mg | 7% |
| Fiber | 1g | 4% |
| Sugar | 8g | 16% |
| Vitamin A | 397IU | 8% |
| Vitamin C | 3mg | 3% |
| Calcium | 39mg | 4% |
| Iron | 2mg | 11% |
* Percent Daily Values are based on a 2,000 calorie diet.