4.5 from 501 votes
Oreo Cheesecake (No Water Bath!)
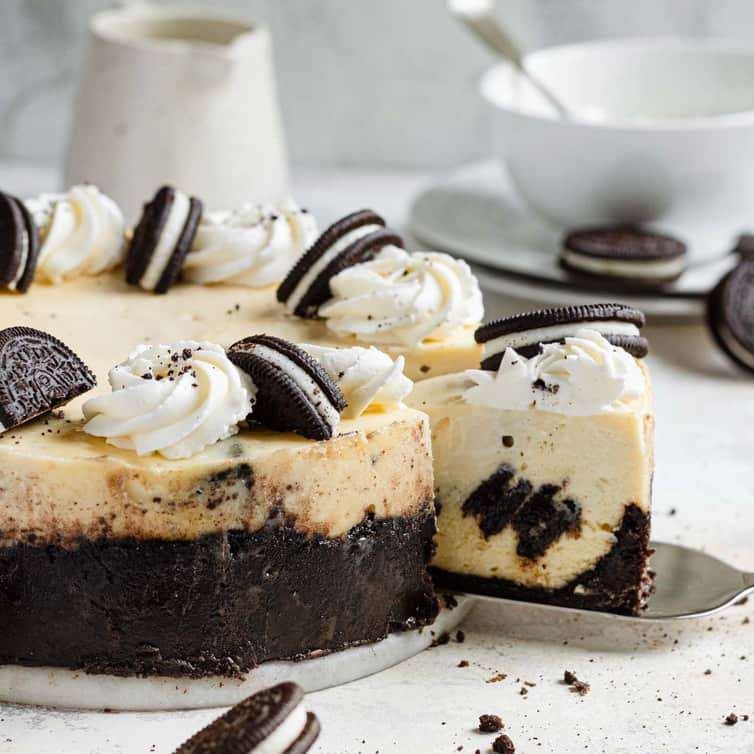
This Oreo Cheesecake features a rich, creamy filling with chunks of Oreo cookies folded throughout, set on a chocolate cookie crumb crust made from crushed Oreos and melted butter. Unlike traditional cheesecakes, this version is baked without a water bath, producing a dense yet smooth texture with Oreo pieces adding contrast and bite.
Prep Time
20 mins
Cook Time
40 mins
Additional Time
11 hrs
Total Time
12 hrs
Servings:
12
servings
Calories:
602 kcal
Course:
Dessert
Cuisine:
American
Ingredients
For the Crust:
- 24 Oreo cookies whole cookie, filling included, crushed into fine crumbs
- 6 tablespoons unsalted butter melted
For the Cheesecake:
- 32 ounces cream cheese at room temperature
- 1 cup granulated sugar
- 2 tablespoons all-purpose flour
- Pinch salt
- ½ cup heavy cream
- 1 teaspoon vanilla extract
- 3 egg
- 1 egg yolk
- 12 Oreo cookies quartered
Instructions
- Preheat oven to 350 degrees F. Grease a 9-inch springform pan; set aside.
- Make the Crust: In a medium bowl, stir together the Oreo cookie crumbs and melted butter with a fork until evenly moistened. Press into the bottom and halfway up the sides of the prepared springform pan. Refrigerate while you prepare the filling.
- Make the Cheesecake: Using an electric mixer on medium-low speed, beat the cream cheese, sugar, flour and salt until the mixture is creamy and no lumps of cream cheese remain, about 3 minutes. Scrape down the sides of the bowl, add the heavy cream and vanilla and beat to combine. Beat in the eggs and yolk one at a time, beating for about 15 seconds before adding the next. Using a rubber spatula, mix a few times by hand to ensure that all of the ingredients are evenly incorporated. Fold in the quartered Oreo cookies.
- Pour the filling into the chilled crust and spread into an even layer. Bake until the outer couple inches of cheesecake looks puffed and set, but the center still jiggles when you move the pan, about 40 to 55 minutes. Turn off the oven, crack open the door and leave the cheesecake inside for 1 hour.
- After an hour, remove the cheesecake from the oven, place on a wire cooling rack and run a thin knife around the edge of the cake. Allow to cool completely to room temperature. Once the cheesecake has cooled to room temperature, refrigerate for at least 4 hours, preferably overnight. Remove from the refrigerator 30 minutes prior to serving, unmold the cheesecake and place it on a serving platter. Leftover cheesecake can be stored in the refrigerator for up to 1 week.
Cup of Yum
Notes
- Nutritional details provided are for one serving.
- Use room temperature cream cheese to ensure a smooth, lump-free filling.
- Watch the cheesecake closely as baking without a water bath requires careful timing to prevent cracking.
Nutrition Information
Calories
602kcal
(30%)
Carbohydrates
47g
(16%)
Protein
9g
(18%)
Fat
44g
(68%)
Saturated Fat
23g
(115%)
Cholesterol
169mg
(56%)
Sodium
429mg
(18%)
Potassium
204mg
(4%)
Fiber
1g
(4%)
Sugar
34g
(68%)
Vitamin A
1417IU
(28%)
Calcium
98mg
(10%)
Iron
4mg
(22%)
Nutrition Facts
Serving: 12 servings
Amount Per Serving
Calories 602
% Daily Value*
| Calories | 602kcal | 30% |
| Carbohydrates | 47g | 16% |
| Protein | 9g | 18% |
| Fat | 44g | 68% |
| Saturated Fat | 23g | 115% |
| Cholesterol | 169mg | 56% |
| Sodium | 429mg | 18% |
| Potassium | 204mg | 4% |
| Fiber | 1g | 4% |
| Sugar | 34g | 68% |
| Vitamin A | 1417IU | 28% |
| Calcium | 98mg | 10% |
| Iron | 4mg | 22% |
* Percent Daily Values are based on a 2,000 calorie diet.