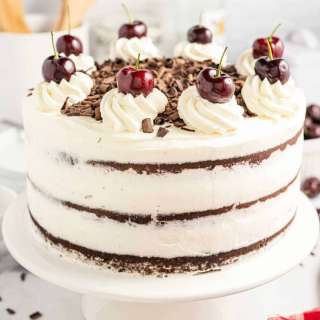
Black Forest Cake (Schwarzwälder Kirschtorte)
User Reviews
5.0
117 reviews
Excellent
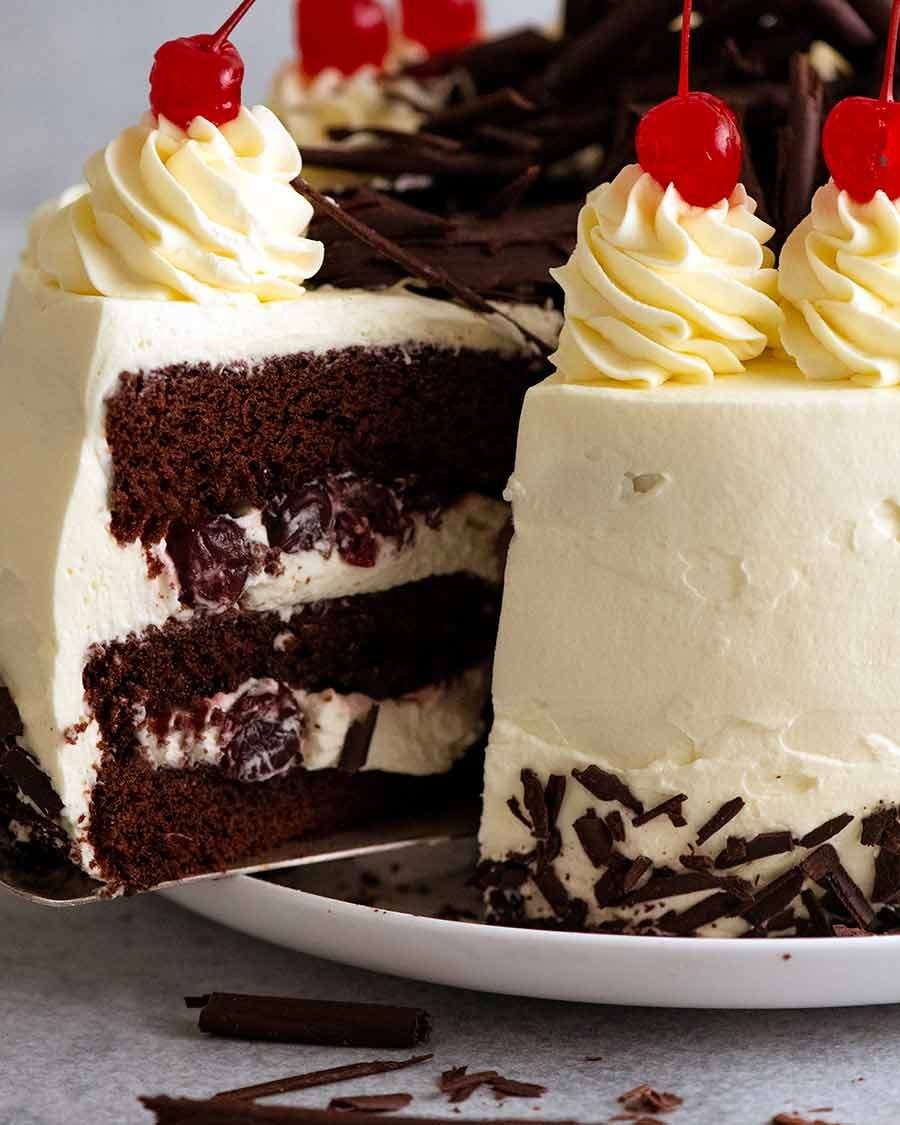
Black Forest Cake (Schwarzwälder Kirschtorte)
Report
Recipe video above. The most German of cakes: Black Forest Cake! You'll love how this cake's layers are lovely and moist (too often they are terribly dry!), and how this Black Forest Cake is not too sweet so you can actually taste all the elements. TIP: Though it seems a shame not to use fresh cherries when they're in season, using jarred or canned cherries in between sponge layers really does work better. They're softer so texturally they make more sense, plus the flavoured syrup from the jar is perfect to brush the cake layers.You MUST make this cake at least 4 hours ahead or even better, overnight, for flavours to develop!
Share:
Ingredients
Chocolate Cake:
- 6 large eggs , at room temperature (Note 7)
- 1 tsp vanilla extract
- 1 1/4 cup caster sugar (superfine sugar)
- 1/2 cup dutch processed cocoa powder (or unsweetened regular cocoa power, Note 1)
- 2/3 cup plain flour (all-purpose flour)
- 150g / 10.5 tbsp unsalted butter , melted and cooled
Cherry Syrup:
- 670g / 23.5 oz pitted morello cherries in syrup (sour cherries, in jar or can) , drained and juice reserved (Note 2)
- 1/3 cup kirsch or cherry liqueur (optional – sub with more reserved cherry juice, Note 3)
- 1/2 cup caster sugar (superfine sugar)
- 4 tsp cornflour / cornstarch
Decorating:
- 4 cups / 1 litre thickened / heavy cream (Note 4)
- 2 tsp vanilla
- 1/3 cup soft icing sugar / powdered sugar (Australia: Not pure icing sugar, Note 5)
- 100g / 3.5 oz dark chocolate / bittersweet chocolate
- 12 maraschino or fresh cherries (for decorating top of cake)
Instructions
Chocolate sponge cake layers:
- Oven and cake pans: Preheat oven to 180°C / 350°F (160°C fan). Grease 3 x 20cm (8”) cake pans with butter, line with parchment / baking paper.
- Sift dry ingredients: Combine dry ingredients by sifting the cocoa and plain flour into a bowl. Set aside.
- Beat eggs: Beat eggs for 30 seconds on speed 6 of a stand mixer fitted with a whisk attachment, or hand beater.
- Slowly add sugar: With the beater still going, slowly pour the sugar in over 45 seconds, then add the vanilla.
- Beat 7 minutes: Beat for 7 minutes more on speed 8, or until tripled in volume and pale in colour. Don't shortcut this step; this is what makes the cake rise (there's no baking powder used).
- Fold in dry ingredients: Add the flour and cocoa mixture to the batter, folding in with a spatula until just combined (a few streaks of flour remaining is fine). Be gentle here, we don't want to knock out the air bubbles.
- Fold in butter: Add the butter and fold gently through until just combined. Once you can no longer see any flour, stop stirring.
- Fill cake pans: Pour the batter into the three prepared pans. The batter should be fairly thin and pourable.
- Bake: Place into the oven and bake for 25 minutes, until springy to the touch and a skewer inserted into the cake centre comes out clean. (Note 5 regarding shelf placement)
- Cool: Remove from the oven. Cool in the pan for 10 minutes before turning the cakes out onto a rack to cool completely.
Cherry syrup:
- Drain cherries: Drain jar of cherries, reserving liquid.
- Cherry cornflour slurry: Measure out 1/4 cup (60ml) of the reserved cherry juice and mix with the cornflour to make a slurry. Set aside.
- Make cherry syrup: Place a medium pot over medium-low heat. Add the sugar and another 1/3 cup of reserved juice. Bring to a gentle simmer to dissolve the sugar. Stir in the cornflour slurry and bring to a simmer. Cook for 1 minute, stirring, until it thickens into a thin syrup.
- Soak cherries, cool: Remove from the heat and stir in the kirsch. Pour the syrup over the drained cherries and allow to cool completely before using.
Chocolate curls (Note 8):
- Melt chocolate: Break up the block of chocolate and place in a microwave-safe bowl. Gently melt in microwave by heating over three 20 second bursts, stirring in between.
- Spread: Pour the melted chocolate over the back of a baking pan and spread out with a spatula as thinly as possible. Refrigerate for 3 - 4 minutes until the centre is just set.
- Scrape curls: Using something with a sharp, straight edge (I use a bench scraper, spatula or the back of a knife also works), hold it at a 45 degree angle and scrape along the tray away from you to create curls. Do a small test patch first. If the chocolate is too hard, the curls may break or flake (leave to soften slightly and try again). If the chocolate is too soft, the curls sag and won't roll (refrigerate more to harden).
- Having problems?? Don't worry! Just scrape to make shavings instead – it still looks amazing!
- Refrigerate: Carefully place curls on a plate and refrigerate until ready to use.
Whip cream:
- Just prior to assembling, place cream, icing sugar and vanilla in a large bowl. Whip into pretty stiff peaks - about 5 minutes on high. Refrigerate until needed.
Assembling:
- Place one cake layer upside down on a serving platter (or cake decorating turn table, if you're a pro! :) ).
- Brush with cherry syrup: Brush the cake layer with 1/4 cup of the cherry syrup the cherries are soaking in.
- Cream layer: Spread with 1 cup of whipped cream, leaving a 1cm (1/2") border (the weight of the next cake layer gently pressed will push cream to edge).
- Layer cherries: Top the cream with half the cherries (in a single layer), using a slotted spoon to drain well (but don't pat dry, want the cherries juicy!).
- Repeat: Top with another cake layer, brush with 1/4 cup syrup, spread with 1 cup cream, top with remaining cherries, and place 3rd cake layer on top.
- Cover with cream: Reserve 1 1/2 cups whipped cream for piping cream decorations. Spread the remaining cream over the top and side of the cake. Pipe dollops around the edge of top using a large star-tipped nozzle. Top each dollop with a maraschino cherry.
- Chocolate shavings: Pile large chocolate curls in the middle (I stack in a tent shape like building a fire!). Use the smaller broken shavings to coat the base of the sides of the cake (using cold hands, scoop up shavings, press on side).
- Rest 4 hours+: Leave cake in the fridge for at least 4 hours, preferably overnight, to allow flavours to develop and syrup to really soak into the cake.
- Take out of fridge: Remove from fridge 30 minutes prior to serving (but be mindful of cream melting on hot days). Slice and serve proudly!
Notes
- Cocoa powder – Dutch processed will give the cake layers a deeper chocolate colour and more flavour. But regular unsweetened cocoa powder will be just fine too – plenty of other flavours going on here in this cake!
- Canned / jarred cherries – Use pitted morello cherries in syrup (sour cherries), drained and juice reserved. Texturally they work better than fresh cherries in this cake (I tried both!) Plus we use the syrup from the jar for the cake syrup.
- Where to get jarred cherries – I use this one or this one from Woolworths, Coles etc in Australia. They're easily found in the canned fruit aisle.
- Frozen pitted cherries – Use these as an alternative. Thaw completely (reserve liquid). Plus use cherry juice for the liquid in the recipe to make the syrup (tip in the liquid from thawed cherries).
- Kirsch or cherry liqueur – This is a key ingredient for a truly authentic Black Forest Cake! However if you cannot have alcohol, substitute with more reserved cherry juice.
- Cream – Yes, I know, it sounds like a LOT! But you will use it all!
- Some recipes use stabilised cream, but I prefer plain fresh cream as it's lighter in mouthfeel. It won't weep within the 3- 4 days that the cake keeps as long you use heavy / thickened cream (rather than plain pure cream) and whip it until stiff as directed in the recipe. After 3 days, the cream starts to noticeably lose aeration but the cake is still deliciously scoff-able!
- STABILISED CREAM OPTION: If you want the cream to look freshly whipped for 4 days, make stabilised cream instead. Here is a PDF document with my recipe for stabilised cream (I will publish it properly one day!!).
- Icing sugar – It's best to use what's labelled "soft icing sugar" in Australia (which is a mix of pure icing sugar + cornflour). For this recipe, what's sold as "pure icing sugar" will also work ok.
- Fitting cakes into oven – If all three cake pans don't all fit on one shelf (like my standard oven), put 2 pans in the middle shelf, and one pan on a shelf directly underneath. Take the top 2 pans out after 25 mins, and leave the bottom cake pan in for another 2 minutes.
- Eggs – Eggs need to be at room temperature and not fridge-cold, to ensure it incorporates properly into the batter or aerates better when beaten. A quick way to warm up fridge-cold eggs: Place eggs in a large bowl, cover with warm tap water (just warm, not hot) and leave for 5 minutes. Wipe dry (to avoid residual water dripping into bowl), then use per recipe.
- Large eggs: 50 – 55g / 2 oz per egg is the industry standard of sizes sold as “large eggs” in Australia and the US. If your eggs are significantly larger or smaller in size, just weigh different eggs and use 330 – 360g / 12 oz in total (including shell) or 300 – 325g / 11 oz in total excluding shell (this is useful if you need to use a partial egg to make up the total required weight. Crack eggs, beat whites and yolks together, THEN pour into a bowl to measure out what you need).
- Chocolate Curls – These can take practice, but honestly, don't get hung up about it. Curls are optional! If they don't work out or you want an easier option, it's easy to make shavings by refrigerating the chocolate until hard, then shave it using a knife, spatular etc. Sprinkle this across the surface. This is what most recipes do anyway, and it looks GREAT!
- Storage and serving – Keeps 3 - 4 days in the fridge. Keep covered. Take out 30 mins prior to serving (watch the cream on hot days).
Nutrition Information
Show Details
Calories
668cal
(33%)
Carbohydrates
60g
(20%)
Protein
7g
(14%)
Fat
45g
(69%)
Saturated Fat
28g
(140%)
Trans Fat
1g
Cholesterol
217mg
(72%)
Sodium
77mg
(3%)
Potassium
263mg
(8%)
Fiber
2g
(8%)
Sugar
37g
(74%)
Vitamin A
2006IU
(40%)
Vitamin C
2mg
(2%)
Calcium
106mg
(11%)
Iron
2mg
(11%)
Nutrition Facts
Serving: 12- 16 slices
Amount Per Serving
Calories 668 kcal
% Daily Value*
| Calories | 668cal | 33% |
| Carbohydrates | 60g | 20% |
| Protein | 7g | 14% |
| Fat | 45g | 69% |
| Saturated Fat | 28g | 140% |
| Trans Fat | 1g | 50% |
| Cholesterol | 217mg | 72% |
| Sodium | 77mg | 3% |
| Potassium | 263mg | 6% |
| Fiber | 2g | 8% |
| Sugar | 37g | 74% |
| Vitamin A | 2006IU | 40% |
| Vitamin C | 2mg | 2% |
| Calcium | 106mg | 11% |
| Iron | 2mg | 11% |
* Percent Daily Values are based on a 2,000 calorie diet.
Genuine Reviews
User Reviews
Overall Rating
5.0
117 reviews
Excellent
Other Recipes
You'll Also Love