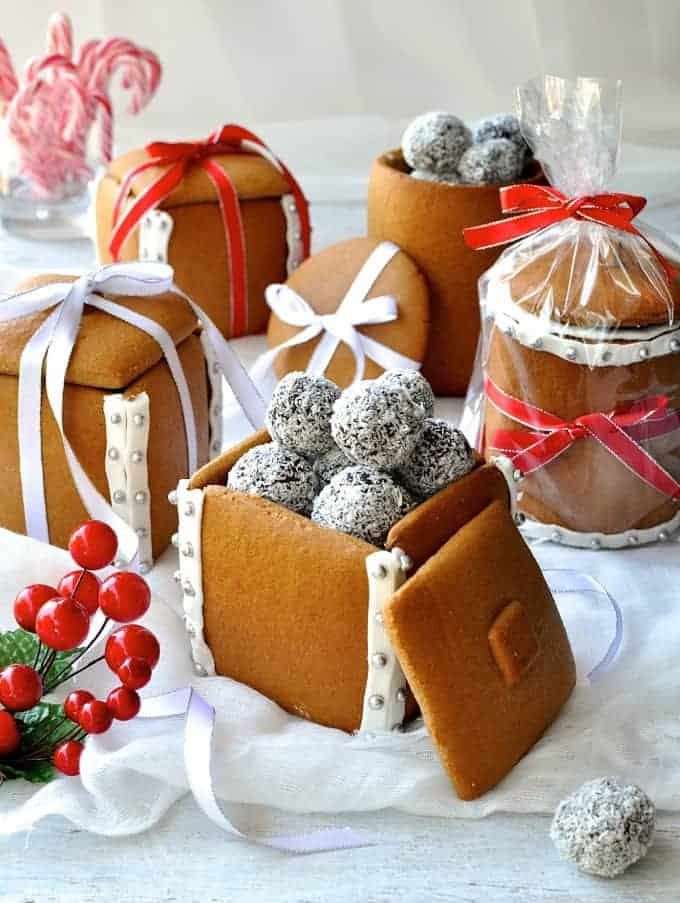
Gingerbread Boxes & Mason Jars
User Reviews
5
-
Prep Time
45 mins
-
Cook Time
15 mins
-
Total Time
1 hr
-
Servings
2 Boxes or Mason Jars
-
Calories
198 kcal
-
Course
Baked Goods
Gingerbread Boxes & Mason Jars
Description
The Gingerbread Boxes & Mason Jars recipe starts with a dough combining butter, brown sugar, honey, egg, and a blend of aromatic spices including ginger, cinnamon, and allspice. After mixing and chilling the dough, it is rolled out thinly between parchment sheets to reduce stickiness and improve handling. The gingerbread is shaped into boxes and jars, which bake into firm, edible structures ideal for holiday presentation. Decorating with optional royal icing and silver sugar balls adds a festive touch. The recipe also suggests creative variations such as forming mug handles and filling the gingerbread jars with treats or hot chocolate mixes.
The spiced dough delivers a balance of sweet and warm flavors, baked to a crisp finish that retains the desired shape thanks to careful chilling steps before and during baking. The use of chocolate buttons to bind pieces enables sturdy construction of the boxes and jars. This detailed method ensures that the gingerbread maintains form rather than sagging or spreading unevenly when heated.
Serving these gingerbread boxes and jars works well during holidays as edible gift containers or decorative treats. They pair nicely with festive drinks or as charming centerpiece items. The recipe references preparing empty cans as molds to support shaping and baking, guiding toward creating well-defined shapes with attention to oven positioning and dough thickness.
Notes emphasize patience with cooling the butter mixture before adding egg to avoid curdling and sticky dough, plus chilling the dough thoroughly for manageable rolling and shaping. Using parchment paper layers helps roll dough evenly. For mason jars, dough size should accommodate stretching without shortage. If shapes lose form slightly during baking, visual fixes include piping royal icing rims or adding ribbons.
Ingredients
Gingerbread
- 50 g / 1.8 oz butter chopped, unsalted
- 1/2 cup brown sugar firmly packed
- 1/2 cup honey
- 1 egg , lightly whisked
- 2 1/2 cups plain flour
- 1 tsp baking powder
- 1 tsp bicarbonate of soda
- 1 1/2 tsp ground ginger
- 1 1/2 tsp ground cinnamon
- 1/2 tsp allspice or ground cloves
To Construct Boxes
- 1 cup milk chocolate buttons
Royal Icing (Optional for decorating)
- 1 egg , white only
- 2 cups icing sugar confectioner's sugar, sifted
Decorations (Optional)
- silver sugar balls
Equipment Required for Mason Jars
- 2 x empty 400g /14oz cans , washed and labels removed (e.g. canned tomatoes)
Instructions
- Place butter, brown sugar and honey in a small saucepan over low heat. Stir until the butter is melted and sugar is dissolved. Set aside until almost at room temperature. (Note 1)
- Pour into a large bowl and add the egg. Mix until combined.
- Sift the remaining Gingerbread ingredients straight into the bowl. Mix until just combined, then use your hands to knead it a few times in the bowl to bring the dough together. (Or turn onto work surface if your bowl isn't large enough).
- Flatten dough into a disc, wrap in cling wrap and place in the fridge for 1 1/2 hours. (Note 2)
- Remove dough from fridge. For ease of handling, cut the dough into 2 pieces. Use a rolling pin to roll out to 3mm / 1/ 10" thickness between two pieces of baking (parchment) paper. See Note 3 for an easy way to do this.
- Proceed with instructions to make Boxes or Mason Jars.
Preparing and Baking Boxes
- Preheat oven to 180C/350F with one oven shelf in the centre and the other directly below it.
- Line 2 baking trays with baking paper (parchment paper).
- Cut out 12 squares from the rolled out dough that are 8cm x 8 cm (3" x 3"). Place onto baking tray.
- Optional: Cut 2 x small squares to use as the "knob" in the centre of the lid. Place small squares in the centre of 2 squares.
- Bake for 12 to 15 minutes until golden brown. The top tray will take around 12 minutes, the bottom tray will be closer to 15 minutes (move it to the upper shelf when you take out the first tray).
- Allow to stand for 5 minutes on the tray then remove onto cooling racks.
Constructing Boxes
- Once the squares are cool, select 8 squares to be the walls of the boxes and line them up in front of you with the flat side down on the bench (i.e. the side that was on the baking tray).
- Use a knife to trim the bottom and right side of each square (to make the edges flat - easier to construct).
- Melt the milk chocolate buttons.
- Use a knife to spread melted chocolate on the right edge (that you trimmed) of one square (Square A). Hold Square A standing upright so the bottom edge (that you trimmed) is flat on the work surface.
- Get another square (Square B) and hold it upright so the bottom trimmed edge is on the work surface. Attach the chocolate edge of Square A to the flat side of Square B (i.e. the side that was on the baking tray). Hold for 20 seconds to let the chocolate firm up a bit.
- On Square B, use a knife to spread melted chocolate on the right edge you trimmed. Then attach that to another square, then repeat until you have constructed the walls of a box. Repeat for other box.
- While the walls are setting, get two more squares. Trim them with a knife so they are the right size to fit inside the walls - this will be the Base of the box. Spread a little chocolate on the edges of the square then pick up the walls and put it over the Base and push down so the Base fits inside the walls.
- Use Royal Icing to hide the edges and decorations of choice. I used Silver Sugar Balls. Attach the decorations while the Royal Icing is wet.
Prepare Mason Jars
- Line 1 baking tray with baking paper (parchment paper).
- Press the open end of the can into the dough to cut out 2 rounds. These will be the base.
- Cut 2 x strips of baking paper that are at least the height of the can and are long enough so it will overlap when you wrap the can. Butter the baking paper then wrap around the cans.
- For cutting the dough: Cut a rectangle out of baking paper that is the height of the can and the length to wrap around the can with a 1 inch / 2cm overlap. **This is important. See Note 4.**
- Lay the rectangle from step 4 on the dough and use a large knife to cut out the rectangle. Repeat to make two rectangles.
- Leaving the dough on the baking paper it was rolled out on, place the can on one end of the dough and roll up firmly to cover the can. Make sure it wraps snugly, saggy dough will result in a saggy Mason Jar. Remove parchment paper, trim any excess dough and use your fingers to seal. Repeat with other can. Place the cans on their side on the baking tray, seam side down.
- Gather up the dough remnants and roll out again. Place one can with the dough wrapped around it upright onto the dough and use a small knife to cut out rounds. Repeat to make 2 rounds. These will be the lids. Place onto baking tray.
- Optional: Cut a small square and place in the centre of the lids. (I forgot to do this and had to stick on a cooked piece of gingerbread!)
- Place baking tray in the fridge with the cans on their side for 30 minutes. This helps stop the mason jars from sliding down when baking.
Baking Mason Jars
- Preheat oven to 180C/350F. Put the oven shelf in the middle of your oven (note 5).
- Remove the baking tray from the fridge. If the dough on the cans has sagged slightly, use your hands to press it against the can.
- Turn the cans upright on the baking tray and place the tray into the oven.
- Bake for 20 to 25 minutes, until golden brown, turning the tray halfway through (so the mason jar bakes an even colour).
- Remove from oven and let cool for 5 minutes before transferring to a cooling rack.
- Once cool, gently pull the can and baking paper out of the Mason Jar. It should slip out fairly easily, if not, just twist it slightly to loosen then pull out.
- Fit the small circles into the base of the Mason Jar. It might need trimming to fit - be careful not to over trim, you want it to fit snugly. You do not need anything to make it stay in place because the gingerbread is sticky and the base should fit snugly.
- Decorating is optional. With a ribbon, I don't think any decorations are required. On one, I piped Royal Icing along the bottom, top and rim with Silver Sugar Balls.
Royal Icing
- Use a mixer to beat the egg white until soft peaks form. Gradually add icing sugar, a heaped dessert spoon at a time, making sure it is incorporated before adding the next tablespoon.
- Transfer the Royal Icing into a piping bag with tip of choice.
- Use to decorate the Boxes and Mason Jar, as desired.
To Gift
- Fill with homemade (or bought) treats of choice. Mine are pictured filled with homemade Chocolate Ganache Truffles. Tie with ribbons to make them pretty!
Notes
- Allow the butter, sugar, and honey mixture to cool to nearly room temperature before adding the egg to prevent cooking the egg.
- Chill the dough solidly for best handling; it will be sticky and difficult to work with without this step.
- Roll the dough between parchment sheets for even thickness and reduced sticking.
- Cut dough pieces generously when wrapping molds to ensure full coverage, trimming excess after.
- Place oven racks to accommodate the height of shaped gingerbread for even baking and shape preservation.
- If form distortion occurs during baking, embellish with royal icing or ribbon to refine appearance.
- Use leftover dough creatively, such as making mug handles attached with melted chocolate for functional decoration.
Nutrition Information
Show DetailsNutrition Facts
Serving: 2Boxes or Mason Jars
Amount Per Serving
Calories 198 kcal
% Daily Value*
| Serving | 55g | |
| Calories | 198cal | 10% |
| Carbohydrates | 38.1g | 13% |
| Protein | 3.3g | 7% |
| Fat | 4g | 6% |
| Saturated Fat | 2.3g | 12% |
| Cholesterol | 23mg | 8% |
| Sodium | 136mg | 6% |
| Potassium | 96mg | 2% |
| Fiber | 0.9g | 4% |
| Sugar | 17.6g | 35% |
| Vitamin A | 100IU | 2% |
| Calcium | 30mg | 3% |
| Iron | 1.4mg | 8% |
* Percent Daily Values are based on a 2,000 calorie diet.
User Reviews
Overall Rating
5
You'll Also Love