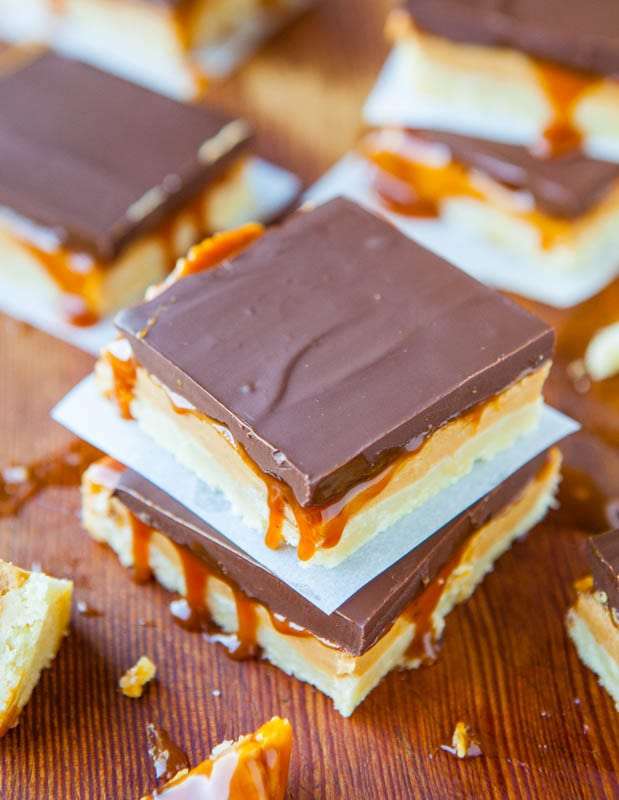
Peanut Butter Caramel Twix Bars
User Reviews
5
-
Prep Time
15 mins
-
Cook Time
12 mins
-
Total Time
27 mins
-
Servings
12
-
Course
Baked Goods
Peanut Butter Caramel Twix Bars
Description
The recipe begins with a shortbread crust made from extremely soft butter blended with all-purpose flour, confectioners’ sugar, cornstarch, and vanilla extract to form a sandy, crumbly dough pressed into a pan and baked until set but not browned. While the crust bakes, a peanut butter filling is made by melting butter and mixing it with creamy, store-bought peanut butter, confectioners’ sugar, and vanilla extract, which is spread evenly over the crust.
A caramel layer, either store-bought salted caramel sauce or homemade, is poured on top of the peanut butter layer, adding a gooey, sweet balance. Finally, a chocolate top is created by melting semi-sweet chocolate chips with vegetable shortening to produce a smooth, less brittle coating that is poured over the caramel. The bars are chilled to set the layers before slicing.
This no-bake topping and multiple textured layers make the bars rich and indulgent, with the chocolate’s smoothness complementing the creamy peanut butter and sticky caramel atop a crumbly shortbread base. The use of vegetable shortening helps prevent the chocolate from cracking when cut.
Ingredients
Shortbread Crust
- ½ cup butter extremely soft (1 stick, unsalted
- 1 cup all-purpose flour
- ⅓ cup confectioners’ sugar
- 1 tablespoon cornstarch
- 1 teaspoon vanilla extract
Peanut Butter Filling
- 2 tablespoons butter melted, unsalted
- 1 cup peanut butter like Jif or Skippy; not homemade or ‘natural’, it’s too thin and runny, creamy
- ½ cup confectioners’ sugar
- ½ teaspoon vanilla extract
Caramel Layer
- about 8 ounces salted caramel sauce (I used most of a 10-ounce jar of Trader Joe’s Fleur de Sel Caramel Sauce], just eyeball it. Or make [Caramel Sauce] or make 5-Minute [Caramel Sauce
Chocolate Layer
- 1 ½ to 1 ¾ cups chocolate chips I used a 9 ounce bag, semi-sweet
- 2 to 3 tablespoons vegetable shortening optional but recommended (for smoothness and so chocolate doesn’t set up overly firm, causing it to crack upon slicing)
Instructions
- Preheat oven to 350F. Line an 8-inch square baking pan with aluminum foil leaving overhang, spray with cooking spray; set aside. This is a messy recipe and I highly suggest lining your pan for easier cleanup.
- Shortbread Crust – Combine all ingredients in a medium mixing bowl, cutting in the butter with a pastry cutter, wooden spoon, or your fingers until until a sandy, crumbly mixture forms. Transfer crumbly mixture to prepared pan and using your fingertips, press crumbs down to form an even flat layer of crust. Pierce crust with a fork haphazardly in a dozen places so steam can escape while it bakes. Bake for 12 to 15 minutes, or until crust has just barely set. It should not be golden or browned at all, it should still be white, but crusted over and set. While crust bakes, make the filling.
- Peanut Butter Filling – Melt the butter in a medium microwave-safe bowl, about 1 minute. Add the 3 remaining ingredients and stir until smooth. Spread over crust. Crust does not have to be cool, and spreading it while crust is still warm is beneficial. The filling is thick and resists being spread, but take your time and either push it into place with your fingers, use a spatula, or knife, taking care not to rip the crust while spreading the filling.
- Caramel Layer – Pour caramel sauce over peanut butter. It should smooth out on its own but if necessary, spread it into corners and sides of pan with a knife.
- Chocolate Layer – Combine the 2 ingredients in a medium microwave-safe bowl and heat to melt, about 1 minute. Stop to stir and heat in 15-second bursts until mixture can be stirred smooth. Pour chocolate over caramel layer and if desired, smooth it very, very lightly with an offset spatula or knife.
- Cover pan with aluminum foil (to prevent fridge smells), and place pan in the refrigerator for at least 3 hours, or overnight, before lifting out with foil overhang, and slicing and serving. If bars have become very cold, allow them to come up to room temperature for a few minutes before slicing. I prefer to store the bars in the refrigerator, where they’ll keep for at least 10 days, or in the freezer for up to 3 months. Crust may lose some degree of snap and crunch if storing the bar for longer durations, but it’s very liveable.
User Reviews
Overall Rating
5
You'll Also Love