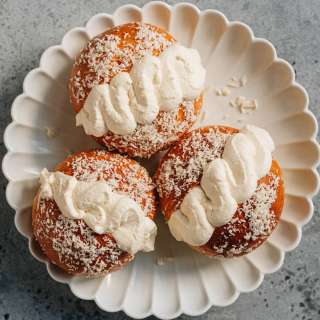
Pineapple Buns (Bolo Bao)
User Reviews
4.9
84 reviews
Excellent
-
Prep Time
1 hr 15 mins
-
Cook Time
15 mins
-
Additional Time
1 hr
-
Total Time
2 hrs 30 mins
-
Servings
16 buns
-
Calories
240 kcal
-
Course
Baked Goods
-
Cuisine
Chinese
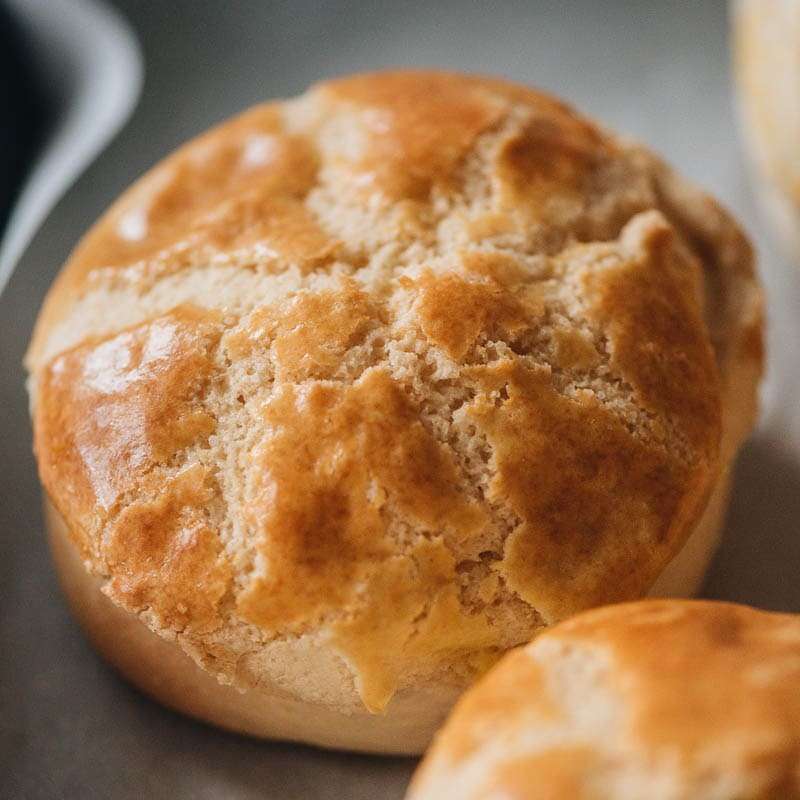
Pineapple Buns (Bolo Bao)
Report
Learn how to make Asian bakery style pineapple buns in your own kitchen. These buns are light, soft, and airy, with an extra crispy, buttery, and sugary crust that cracks perfectly into a pineapple pattern. Detailed step-by-step pictures and video are included to walk you through each detail.
Share:
Ingredients
Topping
- 60 g (4 tablespoons) butter
- 2 teaspoons whole milk
- 1 egg yolk
- 1/2 teaspoon vanilla extract
- 140 g (2/3 cup) sugar
- 150 g (1 cup) all-purpose flour
- 1/2 teaspoon baking powder
- 1/2 teaspoon baking soda
- pinch of salt
Bread
- 180 g (3/4 cup) whole milk
- 70 g (1/3 cup) sugar
- 7 g (1 packet) active dry yeast
- 160 g (3/4 cup) heavy cream
- 1 large egg
- 300 g (2 cups) bread flour
- 225 g (1 3/4 cups) all-purpose flour
- 5 g (1 teaspoon) salt
- 50 g (3 1/2 tablespoons) butter , softened
Egg wash
- 2 egg yolks
- 2 teaspoons whole milk
- 1/2 teaspoon sugar
Instructions
Make the bread topping dough
- Heat the butter in the microwave until it melts completely. Once the melted butter is slightly cooled, add the milk, egg yolk, vanila, and sugar. Mix with a spatula until smooth.
- Combine the flour, baking powder, and baking soda in another medium-sized bowl. Stir to mix a few times, then transfer it to the bowl with the wet ingredients.
- Mix with a spoon or fork until a dough forms. The dough should be very crumbly. Use your hand to press the crumbs together until a thick dough log is formed (see picture in the blog post).
- Transfer the dough onto a large piece of plastic wrap and wrap the dough. Continue shaping the dough once wrapped, so it forms a thick cylindrical log, about 2” (5 cm) in diameter.
- Transfer the dough to the fridge until ready to use.
Make the bread dough
- Add the milk into a small bowl and warm it to approximately 100-110°F (38°C), about 30 seconds in the microwave. The milk should be warm, just a bit above body temperature. Pour it into the KitchenAid mixing bowl. Add the sugar and yeast. Stir it slightly and let it sit for 5 minutes to activate the yeast. You can tell the yeast has activated when there are bubbles forming in the liquid and a strong yeasty smell.
- Add the heavy cream, egg, bread flour, all-purpose flour, and salt into the bowl (add the salt at the end to prevent it from directly touching the yeast).
- Install the dough hook on your KitchenAid. Mix at setting 2, until a dough forms, about 2 minutes.
- Turn off the mixer. Add the butter to the dough. Use a spatula to smear the butter into the dough to prevent it from splashing. Turn the mixer to setting 6. Knead for another 14 minutes, until the dough is smooth and stretchable. During mixing, turn off the mixer and scrape the sides as needed to make sure all the butter is incorporated. Test the dough by pulling a piece of it using both of your hands. It should stretch into a very thin and translucent sheet.
- Form the dough into a tight ball by pulling its sides to the bottom, then place back in the mixing bowl. Cover the top of the bowl loosely with plastic wrap and place it in a warm and humid part of your home. Allow to rise until it double in size, about 1 hour.
Shape the bread dough
- Line a large baking sheet with parchment paper.
- Once the dough is rested, punch the dough softly to push the air out. Place the dough onto an unfloured working surface and knead it a few times. Use a bench scraper or a knife to cut the dough in half, then halve it again into four pieces, and cut each piece into four even pieces, so you get 16 pieces in total. For a more accurate result, you can weigh the dough so each piece is 62 to 63 g (2.1 to 2.2 oz).
- Loosely cover all the dough pieces with plastic wrap and work on the dough pieces one at a time.
- Pinch the ends of a dough ball into its bottom and place the pinched side down. Place your hand over the ball, forming a cage with your fingers and working the ball in a circular motion, applying light pressure with all of your fingers, until the ball is well rounded.
- Place the dough ball onto the lined baking sheet. Repeat with the rest of the dough balls. Make sure there is 2” (5 cm) of space between each ball. Cover the dough balls with plastic wrap while you form the rest, to prevent the dough from drying out.
- Once done, make sure the whole tray is loosely covered with plastic wrap. Place it in a warm and humid place. Let it rise for another 30 to 45 minutes, until the size doubles again.
Egg wash
- Make the egg wash by combining the yolk, milk, and sugar in a small bowl. Whisk together until everything is combined.
- Cover with plastic and place in the fridge. Chilling the egg wash will make it slightly thicker so it will stick better when brushed on the dough.
Shape the topping
- Once the topping is chilled, unwrap it. Use a knife to slice off the uneven ends and discard them. Carve marks on the dough so you can slice the log into 16 even pieces (see the blog post for instructional pictures). Then slice the dough accordingly. If the dough is too hard to slice, rest it on the kitchen counter for 10 to 15 minutes to let it soften before cutting.
- Place each piece between two pieces of plastic wrap. Use a rolling pin to flatten the dough without cracking it, until it forms a round disk that is about 2.5” (6 cm) in diameter and 1/4” (5 mm) thick. The dough will be very crumbly and the ends might crack a bit (it’s totally OK!). If you find the dough too difficult to roll out without cracking, you can use your hand to lightly flatten it instead of rolling it. (*Footnote 1)
- Place the rolled/pressed topping disks onto a large sheet of plastic wrap using a thin spatula (you can also stack them together by placing plastic wrap or parchment paper between each piece of dough). Cover with plastic wrap until you’re ready to assemble the buns. (*Footnote 2)
Assemble and bake
- Preheat the oven to 350° F (176° C).
- Once the bread dough has risen again, remove the plastic wrap. Gently place the topping dough disks onto the bread dough rolls.
- Brush all the buns with egg wash. Allow the egg to dry slightly. Then brush them again for a second time to get the beautiful yellow color.
- Bake for 15 to 17 minutes, until the top is golden yellow and the bottom is slightly browned.
- Let the buns rest in the pan for 5 minutes, then transfer them onto a cooling rack.
- Serve warm or at room temperature.
Store
- Once the pineapple buns have cooled completely, you can store them in an airtight container on your kitchen counter for up to 2 days. The rolls will stay delicious at room temperature. You can also warm them up in the microwave for 10 seconds or leave them in a 350° F (176° C) oven to warm before serving.
- For longer storage, place the dinner rolls in a ziplock bag, squeeze out as much air as possible, and store them in the freezer for up to a month. To reheat, bake the rolls at 350° F (176° C) without thawing, until warm throughout, 10 minutes or so.
Notes
- The topping dough will be very crumbly. We’ve tried both rolling the dough and pressing the dough, and found that the rolling method generates a slightly better result. The topping will cover the bread better and the buns will look better. On the other hand, pressing the dough is much easier and the result is just as tasty. Although, the topping will be slightly small and won’t cover the bread fully in that case.
- If your bread has risen while you were working on the toppings, you can place the topping directly onto the bread rolls.
Nutrition Information
Show Details
Serving
1bun
Calories
240kcal
(12%)
Carbohydrates
32.1g
(11%)
Protein
4g
(8%)
Fat
11g
(17%)
Saturated Fat
6.5g
(33%)
Cholesterol
81mg
(27%)
Sodium
213mg
(9%)
Potassium
74mg
(2%)
Fiber
0.6g
(2%)
Sugar
13.9g
(28%)
Calcium
37mg
(4%)
Iron
1mg
(6%)
Nutrition Facts
Serving: 16buns
Amount Per Serving
Calories 240 kcal
% Daily Value*
| Serving | 1bun | |
| Calories | 240kcal | 12% |
| Carbohydrates | 32.1g | 11% |
| Protein | 4g | 8% |
| Fat | 11g | 17% |
| Saturated Fat | 6.5g | 33% |
| Cholesterol | 81mg | 27% |
| Sodium | 213mg | 9% |
| Potassium | 74mg | 2% |
| Fiber | 0.6g | 2% |
| Sugar | 13.9g | 28% |
| Calcium | 37mg | 4% |
| Iron | 1mg | 6% |
* Percent Daily Values are based on a 2,000 calorie diet.
Genuine Reviews
User Reviews
Overall Rating
4.9
84 reviews
Excellent
Other Recipes
You'll Also Love