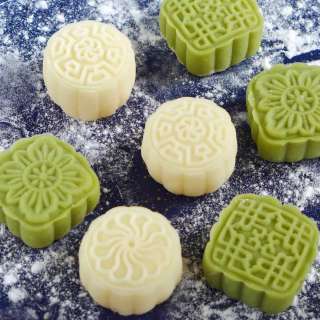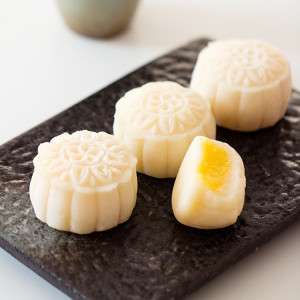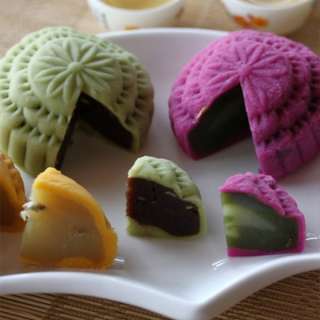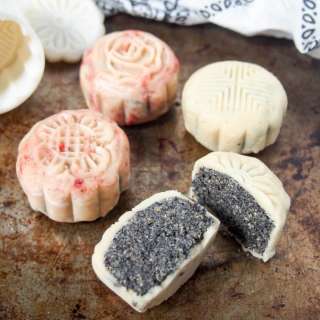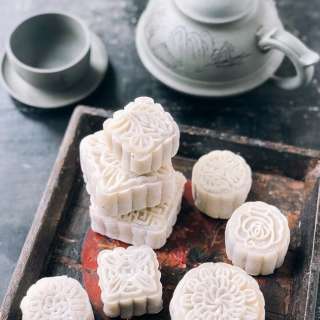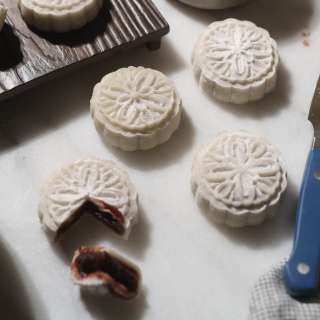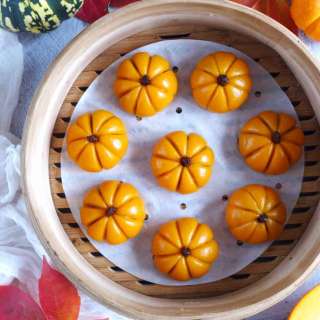
Snow Skin Mooncake
User Reviews
5.0
6 reviews
Excellent
Snow Skin Mooncake
Report
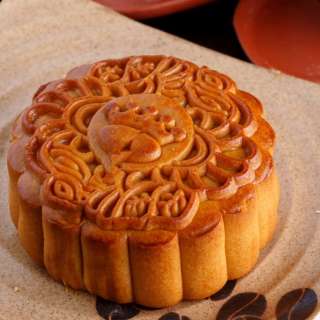
Snow skin mooncakes are popular during the Mid-Autumn Festival. It is a modern and refreshing twist on the traditional baked mooncake.
Share:
Ingredients
Snow skin dough:
- ⅓ cup glutinous rice flour
- ⅓ cup rice flour
- 3 tablespoons wheat starch
- 3 tablespoons sugar
- 2 tablespoons sweet condensed milk
- ⅔ cup milk (I used 2 % fat)
- 1.5 tablespoons vegetable oil
Custard filling:
- 3 large eggs
- ½ cup sugar
- ½ cup milk
- ¼ cup Wheat starch or cornstarch
- 2 tablespoons custard powder
- 3 tablespoons unsalted butter
Dusting:
- 2 tablespoons glutinous rice flour (Cooked)
Instructions
- Put ⅓ cup of glutinous rice flour, ⅓ cup of rice flour and 3 tablespoons of wheat starch into the bowl.
- Add 3 tablespoons of sugar into the bowl and mix it well.
- Next, add 2 tablespoons of sweet condensed milk.
- Pour ⅔ cup of milk and 1.5 tablespoons of vegetable oil into the bowl.
- Mix it well and make sure no lumps.
- Cover the flour mixture with a foil.
- Then, pour 1 cup of water into the instant pot and add a rack. (You can steam over the stove by adding 5 cups of water into the pot or wok.)
- The following step, put the covered flour mixture from step 6 into the instant pot. Close the lid and vent. Push the manual button and adjust time for 20 minutes at high pressure. Then, naturally release the pressure. (If you steam it over the stove, steam it for 30-40 minutes.)
- Meanwhile, working on the filling. Crack 3 eggs into a pot.
- After that, pour ½ cup of milk into the pot.
- Then, add ½ cup of sugar.
- After, add ¼ of wheat starch (you can use cornstarch) and 2 tablespoons of custard powder.
- Stir the mixture very well and make sure no lumps.
- Place the mixture over the stove, turn on a small fire. Then, add 3 tablespoons of unsalted butter.
- Keep stirring and until the custard filling thickens. (Be careful not to burn it.)
- Let the custard filling cool off a little bit, then weigh 25g of custard filling and roll them into a ball. (You can make around 14.)
- When the flour dough is ready, take it out and unwrap it. Use a spatula to mix the dough a little bit.
- Let the flour dough cool off a little, warm but not hot to handle it. Wear gloves and knead the steamed flour mixture into a dough. Then, divide them into 14 pieces, each one is 25g.
- Put 2 tablespoons of glutinous rice flour into a pan and stir fry with a small fire for 2-3 minutes. Do not burn it.
- Assemble the mooncake mold and make sure the pattern cap is secured. Brush some cooked glutinous rice flour into the mooncake mold and dust off the extra flour.
- Take a piece of dough and flatten it.
- Next, put the custard filling ball in the middle on the flatten dough.
- Close it and slightly roll it a little.
- After, put the dough with filling into the mooncake mold.
- Lastly, put the mooncake mold down, press it and push the mooncake out.
- Repeat step 21-25 and finish the rest of the snow skin mooncakes.
Notes
- Use the right flour and choose high-quality glutinous rice flour, wheat starch and rice flour for a smooth, soft, and chewy snow skin.
- Sift the flour, starch and mix the dry ingredients well. Then, add liquid and keep stirring to avoid lumps and ensure a smooth dough.
- Steam the flour mixture until it is fully cooked. This step is important for achieving the right texture in the snow skin.
- Let the dough cool off a little after steaming. It’s hot, so wait until the flour mixture is warm and knead it into the dough.
- After mixing the dough, chill the dough in the refrigerator for 30 minutes. It is because chilling can firm up the dough and make it easier to handle and shape.
- Let the filling cool off. This makes it easier to shape into balls and prevents it from sticking to the snow skin.
- Use a kitchen scale to ensure even portions of dough and filling because you don’t want mooncakes to look uneven or won’t fit into the mold. The mooncake mold that I used was 50g. Therefore, the dough is 25g and the filling is 25g. The mooncakes will be uniform, consistent thickness and size.
- Lightly dust your work surface, hands and mooncake mold inside with cooked glutinous rice flour to prevent sticking when rolling out the dough and shaping the mooncakes.
- Place the wrapped mooncake into a lightly dusted mooncake mold, then press gently to shape and imprint a design. Release and tap the mooncake mold.
- Allow the mooncakes to rest in the refrigerator and chill for a few hours or overnight. This helps the flavors meld and the snow skin to firm up slightly, making them more enjoyable to eat. It has a refreshing and smooth texture when you serve them straight from the refrigerator.
Nutrition Information
Show Details
Calories
152kcal
(8%)
Carbohydrates
22g
(7%)
Protein
3g
(6%)
Fat
6g
(9%)
Saturated Fat
3g
(15%)
Polyunsaturated Fat
1g
Monounsaturated Fat
2g
Trans Fat
0.1g
Cholesterol
55mg
(18%)
Sodium
33mg
(1%)
Potassium
74mg
(2%)
Fiber
0.2g
(1%)
Sugar
12g
(24%)
Vitamin A
178IU
(4%)
Vitamin C
0.1mg
(0%)
Calcium
46mg
(5%)
Iron
0.3mg
(2%)
Nutrition Facts
Serving: 14Serving
Amount Per Serving
Calories 152 kcal
% Daily Value*
| Calories | 152kcal | 8% |
| Carbohydrates | 22g | 7% |
| Protein | 3g | 6% |
| Fat | 6g | 9% |
| Saturated Fat | 3g | 15% |
| Polyunsaturated Fat | 1g | 6% |
| Monounsaturated Fat | 2g | 10% |
| Trans Fat | 0.1g | 5% |
| Cholesterol | 55mg | 18% |
| Sodium | 33mg | 1% |
| Potassium | 74mg | 2% |
| Fiber | 0.2g | 1% |
| Sugar | 12g | 24% |
| Vitamin A | 178IU | 4% |
| Vitamin C | 0.1mg | 0% |
| Calcium | 46mg | 5% |
| Iron | 0.3mg | 2% |
* Percent Daily Values are based on a 2,000 calorie diet.
Genuine Reviews
User Reviews
Overall Rating
5.0
6 reviews
Excellent
Other Recipes
You'll Also Love