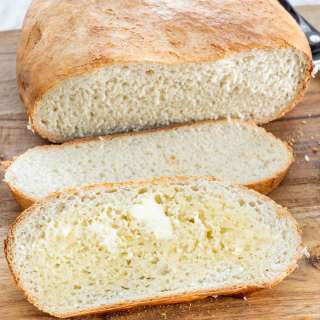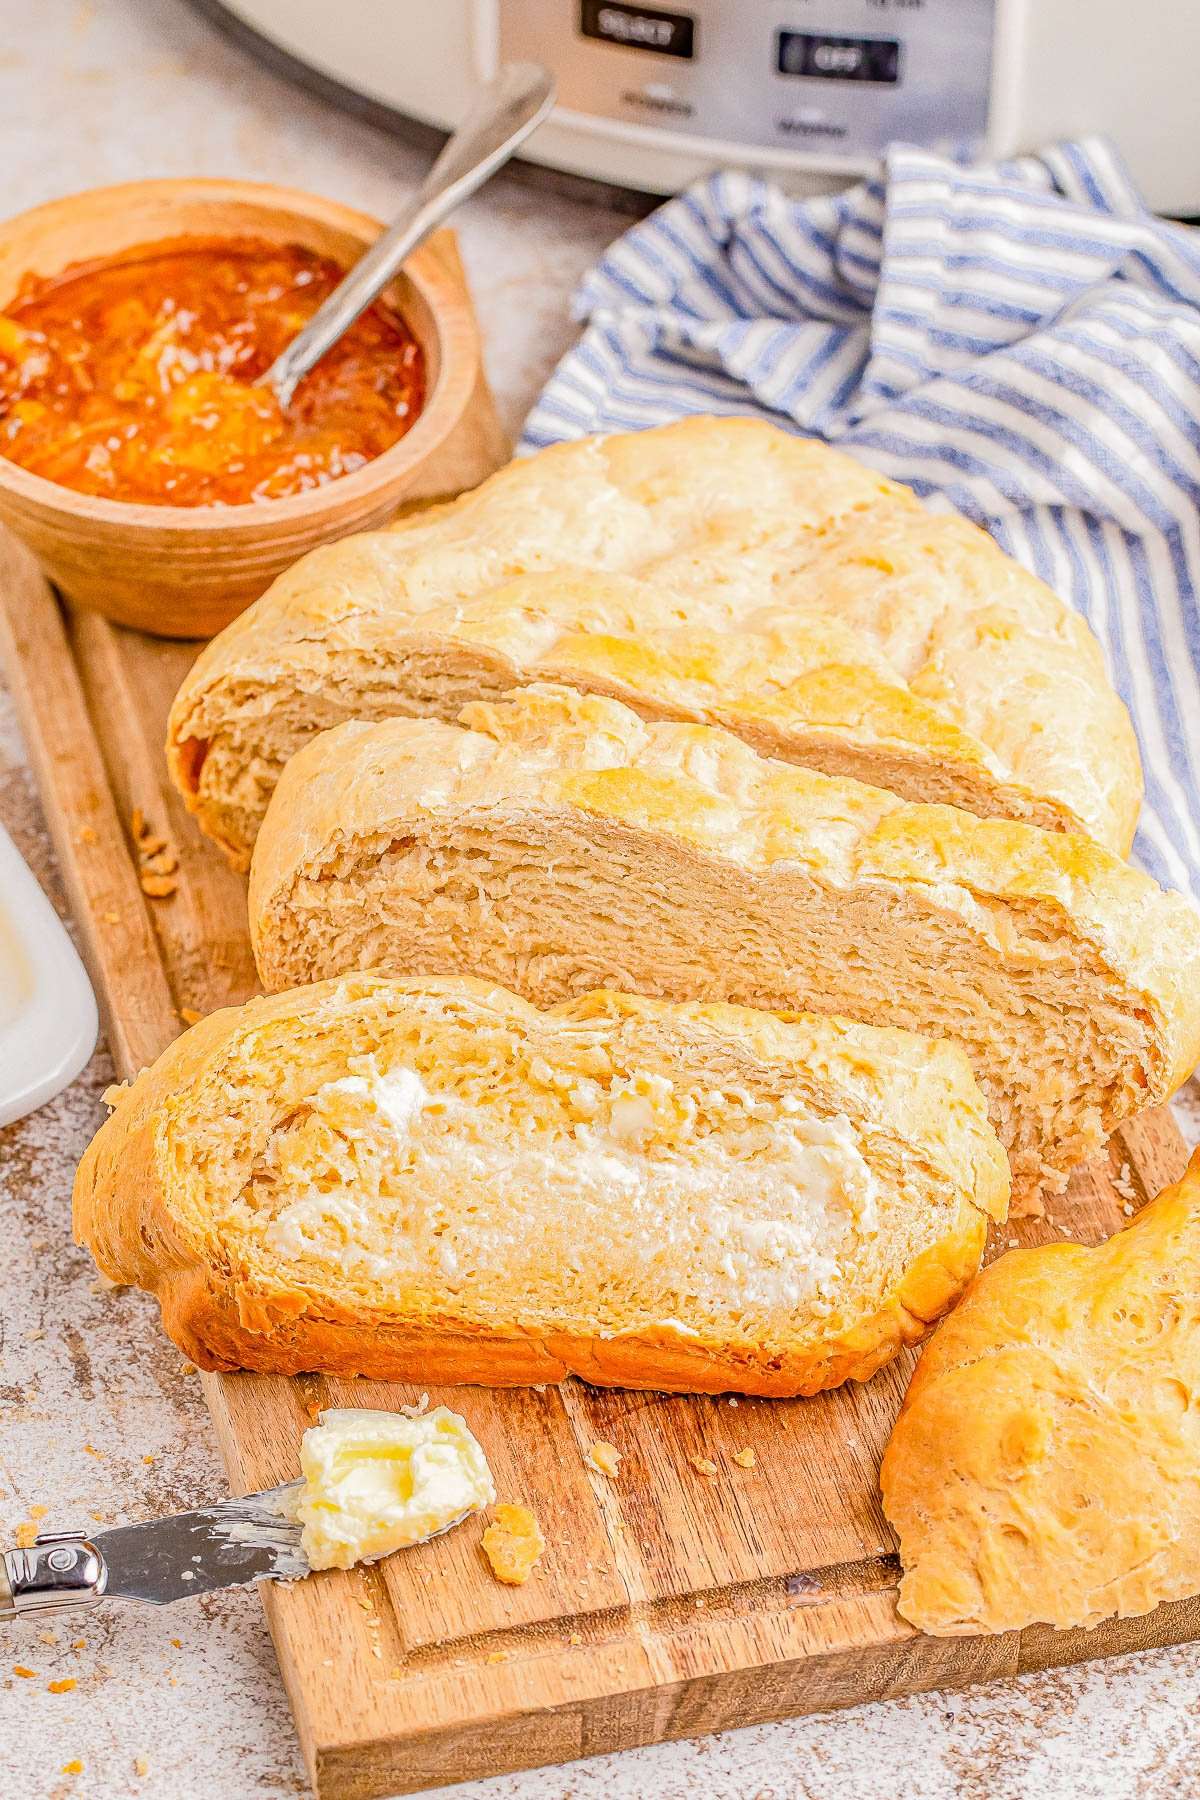
Slow Cooker Bread
User Reviews
4.8
27 reviews
Excellent
Slow Cooker Bread
Report
🍞🙌🏻💛 Learn how to make yeast bread in your Crock-Pot in less than 2 hours! Knead it briefly once, place the dough in your slow cooker, and let it do all the work! This is the EASIEST loaf of homemade bread you'll ever make! It has a crunchy crust with a soft and chewy center and is lovely toasted, as sandwich bread, or use it like you'd use French bread to sop up pasta sauce or dunk into soup.
Share:
Ingredients
- 1 cup lukewarm water
- 1 tablespoon granulated sugar
- 1 tablespoon honey
- 1 packet instant dry yeast about 2 ¼ teaspoons, or 1/4-ounce
- 3 cups all-purpose flour plus more to flour the countertop or for the dough
- 2 tablespoons vegetable oil or another neutral oil such as canola, avocado, etc.
- 1 teaspoon salt
Instructions
- To an oval 6-quart slow cooker or similar (5 quart or 7 quart are fine, but don't go smaller/round, and bigger is unnecessary), place a piece of parchment paper and I like to spray my parchment with cooking spray, although it's optional. Set aside momentarily.
- To a 2-cup glass measuring cup or similar, add the water (warm water from the tap is fine, no need to warm it more), sugar, honey, and sprinkle the yeast on top. Allow it to rest for about 10 minutes, during which time it should turn foamy and creamy. This is called 'proofing' the yeast, or proving that it's alive. While not technically necessary when using instant dry yeast, I always do it to make sure my yeast is good. Tips - The water should be warm, but not too hot because you don't want to kill the yeast which can happen if it's too hot. Water that feels nicely hot to wash your hands in is what you're looking for. If the yeast does not turn foamy and creamy, it means it's dead or not active, and you would need to start over. Don't use it because your bread will never rise!
- While waiting for the yeast to proof, to a large mixing bowl, add the flour, oil, and salt.
- Add the yeasty water mixture to the flour mixture, and using a wooden spoon, stir to combine and form a shaggy dough.
- To a clean countertop, sprinkle a few tablespoons of flour, and turn the dough out on the countertop and begin kneading it. Knead it for about 3-4 minutes, or until a smooth round ball can be formed. It will grow in size as you knead it and star to 'resist' your kneading. This is what you want, the yeast is alive. Kneading and Dough Tips - Bread dough by its very nature is sticky and tacky and in general, the less flour you add, the lighter and more airy the finished bread will be. However, if your dough is so wet and sloppy that you can't really knead it, or it's just not coming together, sprinkle it with a couple tablespoons of flour, knead, and repeat as necessary until it's firm enough to knead and take shape.
- Place your round ball of dough onto the parchment paper in the slow cooker, cover it with a lid, and cook on HIGH for 1 1/2 to 2 hours, or until done. I have not tested on low and believe HIGH is better suited for this recipe. Cooking Tips - If the bottom of your bread is cooking too quickly, flip it over halfway through the cook time. Bread is done when the crust has browned and set, and the interior is cooked through. In general, I would err on the side of more cooking, and not less. You don't want to slice into it and find that it's raw. You cannot put it back! Baking does not work that way so I like to be extra certain it's done. You can try to insert a long wooden skewer in it, and if it comes out gooey at all, it's not done. Because slow cookers vary a ton in their heat output, the cook time of 1 1/2 to 2 hours is an estimate only, and you should slow cook your bread as long as necessary, even if that mean 2 1/2+ hours. Also, if your kitchen is warm or cold, the flour you used, the density of your dough, will all affect cooking duration. Finally, RESIST the urge to keep checking on your bread because every time you lift the lid of your slow cooker, heat escapes, and it unnecessarily slows down the cooking process. Check after an hour or so, but be mindful.
- Allow the bread to cool before slicing and serving. You can also toast it, serve it with butter, honey, jam, jelly, etc.
- Optionally, if you’d like a more browned crust, you can place the loaf on a parchment lined baking sheet, preheat your oven to broil, brush the crust with melted butter, and place it under the broiler for 2-3 minutes. BE VERY CAREFUL if you are doing this! Bread is delicate and can go from fine to burnt to a crisp in less than 30 seconds under a 500F+ degrees broiler so make sure to stand in front of your oven and watch it the entire time, like a hawk, so you don't burn it.
- Storage - Bread will keep airtight at room temp for up to 3-4 days or in the freezer for up to 1-2 months.
Equipments used:
Notes
- If you're new to bread making especially, make sure to read over the FAQs in the blog post for answers to questions you may have. Even if you're an experienced bread maker, you may find some helpful tidbits.
Nutrition Information
Show Details
Serving
1slice
Calories
217kcal
(11%)
Carbohydrates
40g
(13%)
Protein
5g
(10%)
Fat
4g
(6%)
Saturated Fat
1g
(5%)
Polyunsaturated Fat
2g
Monounsaturated Fat
1g
Trans Fat
0.02g
Sodium
294mg
(12%)
Potassium
60mg
(2%)
Fiber
2g
(8%)
Sugar
4g
(8%)
Vitamin C
0.02mg
(0%)
Calcium
9mg
(1%)
Iron
2mg
(11%)
Nutrition Facts
Serving: 8Serving
Amount Per Serving
Calories 217 kcal
% Daily Value*
| Serving | 1slice | |
| Calories | 217kcal | 11% |
| Carbohydrates | 40g | 13% |
| Protein | 5g | 10% |
| Fat | 4g | 6% |
| Saturated Fat | 1g | 5% |
| Polyunsaturated Fat | 2g | 12% |
| Monounsaturated Fat | 1g | 5% |
| Trans Fat | 0.02g | 1% |
| Sodium | 294mg | 12% |
| Potassium | 60mg | 1% |
| Fiber | 2g | 8% |
| Sugar | 4g | 8% |
| Vitamin C | 0.02mg | 0% |
| Calcium | 9mg | 1% |
| Iron | 2mg | 11% |
* Percent Daily Values are based on a 2,000 calorie diet.
Genuine Reviews
User Reviews
Overall Rating
4.8
27 reviews
Excellent
Other Recipes
You'll Also Love