The Perfect Pumpkin Pie Recipe
User Reviews
5
4 reviews
Excellent
-
Prep Time
3 hrs
-
Cook Time
2 hrs 20 mins
-
Additional Time
4 hrs
-
Total Time
9 hrs 20 mins
-
Servings
8 servings
-
Calories
442 kcal
-
Course
Dessert, Baked Goods
-
Cuisine
North American, American, Canadian
The Perfect Pumpkin Pie Recipe
Report
The most comprehensive guide to make perfect pumpkin pie! This recipe makes for a silky smooth, creamy, spiced pumpkin pie filling and a buttery, flaky, perfectly baked pie crust. All the tips, ingredient substitutions, and recipe variations will help you make the best homemade pumpkin pie!Makes 1 pumpkin pie (9 - 9.5 inch, standard pie plate).INTERMEDIATE - I provide a very detailed, step by step recipe below that's very easy to follow for a beginner (so don't be intimidated by the length of the recipe). The filling is very easy to make. You can also use store-bought pie crust for convenience.Please use weight measurements for accurate, consistent results. US based cup, teaspoon, tablespoon measurements. Common Measurement Conversions.
Share:
Ingredients
Pumpkin pie crust (crumbly, spiced crust). Makes 1 pie crust for a 9 - 9.5 inch standard pie plate)
- 200 g all-purpose flour 1 ⅔ cups, spooned and leveled
- 30 g brown sugar about 2 tbsp, optional
- ½ tsp salt sea salt
- 1 tsp pumpkin pie spice or cinnamon
- 150 g unsalted butter 11 tbsp / 1 ⅓ stick, grated, frozen
- 30 mL vodka 2 tbsp. (optional, replace with equal amount ice water if you're skipping this, iced
- 45 - 60 mL water 3 - 4 tbsp, ice
- white sugar or rice (for blind baking)
- aluminum foil (for blind baking)
- 1 large egg separated (egg white for one egg wash and the yolk for another)
Pumpkin pie spice mix I use here
- 2 tsp ground cinnamon
- 1 tsp ground ginger
- ½ tsp nutmeg or ¼ tsp pre-ground nutmeg, freshly grated
- ¼ tsp cloves ground
- ¼ tsp ground cardamom
Pumpkin pie filling
- 180 mL maple syrup ¾ cup (can substitute with 150 g brown sugar, or 180mL honey). See recipe notes.
- 10 g cornstarch 1 tbsp
- ¼ tsp salt sea salt
- 2 tsp pumpkin pie spice mix OR store-bought, recipe above
- 2 large egg
- 1 egg from large egg, yolk
- 2 tsp vanilla extract
- 425 g pumpkin puree 1 x 15 oz can OR ½ x 796 mL can, 100% canned
- 354 mL evaporated milk 1 x 15 fl oz can (1 ½ cups)
- 2 drops red gel food coloring Optional
- 2 drops egg Optional, yellow gel food coloring
Pumpkin pie topping options
- Whipped Cream
- Italian meringue
- Whipped Cream Coffee flavored, flavored
Sugar crusted pie bites or pie crust pieces
- pie dough or puff pastry
- egg wash
- raw sugar
Instructions
Pie crust
- Ideally, you should have all the ingredients chilled well. However, it's crucial that at least the butter, water, and vodka (if using) are chilled well.
- If you want to make a flaky pie crust, follow this recipe to make the ultimate flaky pie crust.
- To prepare the butter, first freeze the butter and then grate it. Once the butter is grated, weigh the correct amount and put it back in the freezer.
- Mix the flour, sugar, spice, and salt in a large bowl.
- Add the frozen grated butter, and toss to coat the butter with the flour.
- Using your fingers or a pastry cutter, cut or break the butter into smaller pieces, while tossing to make sure that the butter is still coated in flour.
- For a crumbly, mealy pie crust, the dough crumbs should resemble coarse wet sand, while still retaining some pea-sized butter pieces.
- Drizzle the iced vodka (if using) into the flour mixture and mix with a fork or your fingers.
- Next, start drizzling the ice water, 1 tbsp at a time. The lumps will become bigger as you mix in the liquid. Add more water until more of the dough forms larger, stickier clumps.
- Toss the clumps in the flour mix using your fingers to ensure that the water is mixing as evenly as possible. However, you will find that there will be large wet clumps of dough, and lots of dry spots in the flour mix as well. This is OK!
- To check if there's enough water in the dough (if you're a beginner) – take some of the dough in your hand and squeeze it to form a large clump. The clump should just hold together, along with some dry spots present.
- The pie dough should still have dry spots, and still form a dough when squeezed together. If the dough has too much water, it may shrink while baking and not hold its shape. You should not need more than 75 mL of total liquid for this dough.
- Place a piece of parchment paper on your work surface.
- Turn the pie dough out onto the parchment paper. If the butter softens at any stage, remember to refrigerate / freeze the dough for a few minutes as needed.
- Use the parchment paper to fold the dough over itself to form a rough dough mound. Add a few water drops if needed, so that the dough sticks together. There should be some dry flour spots.
- If there is too much water, and the dough is sticky, sprinkle more flour on the dough.
- As this dough is meant to be crumbly, it does not need to be cut and folded (as you do with flaky pie crusts).
- Once the dough is formed, shape it into a circular disc. Be careful and gentle when handling the dough. Wrap each disc with plastic wrap or parchment paper (tightly) and let it rest in the fridge for at least 1 hour. I prefer to let it rest at least 2 hours, or overnight.
Rolling the dough
- Take the pie dough portion from the fridge. Unwrap the plastic wrap, and place it on a floured surface.
- Strike the dough disc a few times with a rolling pin, on both sides, to make it more pliable and easy to roll out.
- Roll out the dough, while maintaining the shape of a circle as best you can. Squeeze any cracked dough together to seal. Once the pie crust is pliable, turn the dough a quarter turn after each roll, to ensure that the dough maintains the shape of a circle and also does not stick to your work surface. Use a light dusting of flour as needed, and also remember to flip the dough so that you roll it on both sides.
- The pie crust will form cracks, so use your fingers to press the dough together to seal the cracks as you go.
- Roll the dough until it’s about 3 mm in thickness. The diameter may vary, but it should definitely fit a 9.5 inch diameter, deep pie dish.
- If the dough starts to shrink as you roll it, lightly flour the dough surface, fold it into quarters and then cover it with plastic wrap. Let the dough rest in the fridge for at least 20 minutes, and then proceed with rolling it out again.
- Once the dough has been rolled out, transfer the dough onto your pie dish. You can do this by rolling up the dough on a rolling pin and then carefully unrolling it over the pie dish, or by folding it gently into quarters, and placing it in the pie dish and unfolding it to fit inside the pie dish.
- DO NOT stretch the dough to fit it inside the pie dish. This is crucial and a common beginner's mistake. Instead, carefully lift the pie crust and let it gently fall onto the pie dish. Use the back of your fingers to gently press the dough into the bottom of the pie dish, so that it fits neatly in the dish.
- There should be an overhang over the pie dish rim. Using scissors or a sharp knife, cut the excess pie crust, leaving at least a 1 inch (or up to 1.5 inches) overhang over the edge of the pie plate.
- Roll the dough overhang under the pie crust to form a thick border. This should be flush against the rim of the pie dish.
- Hold your thumb and index finger on one hand parallel to each other, and rest the tips of those fingers against the outside edge of the pie border. Then using the index finger or thumb on the other hand, gently push the inside edge of the pie border between the two fingers on your other hand, to create the crimped edge. Repeat this all along the pie border to form a fluted pie crust edge. Alternatively, you can use a fork to crimp the edge as well. (You can check my pie crust recipe for a video on how to do this).
- Cover the pie crust loosely with plastic wrap and let it rest in the fridge for at least 45 minutes. If the butter softens at any stage, refrigerate the crust.
Par-baking the pie crust
- While the pie crust is chilling in the fridge, preheat the oven to 350°F / 180°C (conventional oven). Place the rack in the lower third of the oven, and place a pizza stone OR baking tray on the rack. Let the oven preheat for at least 30 – 45 minutes.
- Take a large piece of foil or parchment paper (large enough to fit inside the pie plate), or two pieces of foil, and gently crumple it. It doesn't need to be crumpled tightly, and avoid tearing the foil.
- Then unfold the foil / paper carefully, and smooth it out. The foil / paper should now be flexible enough to fit inside the pie plate, on top of the chilled pie crust.
- Make sure the foil / paper is touching the whole surface of the pie crust, and loosely covers the border of the pie crust, so it acts as a pie crust shield as well. If needed, use the second piece of foil, to go perpendicular to the first piece of foil so that the whole crust is covered well.
- Fill the pie plate with sugar or rice (not both!). Make sure the weights come at least ¾ of the way up the pie plate. Press down on the sugar to make sure that it’s weighing down on the pie crust well.
- Transfer the pie plate into the preheated oven, on top of the baking tray or pizza stone. Bake for about 40 - 45 minutes, rotating once halfway through baking time, if needed. Keeping a baking tray is a good idea to catch any melted butter from the pie crust. Otherwise it may cause the oven to smoke.
- After 40 - 45 minutes, the bottom of the crust should start to caramelize and turn golden brown in color. The sides and top of the crust will still be very blonde in color (i.e. only have a little bit of color).
- Remove the pie plate from the oven and then VERY CAREFULLY, remove the foil / paper from the pie plate along with the baking weights (making sure not to spill anything!). Immediately transfer the weights into an empty bowl or plate. Be careful with this step since the foil will be hot, and you need to hold it firmly to prevent any tearing and spilling of contents.
- Use a fork to prick the bottom of the pie crust, and place a pie crust shield along the edge of the pie crust. I use a silicone crust shield, but you can also make one with foil as well.
- Return the blind baked pie crust to the oven and bake for a further 5 – 10 minutes until the bottom of the crust looks matte or dry.
- While this is happening, separate the egg into egg yolk and egg white into two separate small bowls. Whisk the egg white until a little foamy.
- Remove the pie crust from the oven, and brush the inside of the pie crust (bottom and sides) with the egg white wash. Return the pie crust into the oven to bake for 5 minutes, until the egg wash looks dry.
- Remove the pie crust from the oven and let it cool.
Whisk and bowl
- Place the spices, salt, and cornstarch in a large bowl and whisk to combine. Make sure there are no lumps in the cornstarch.
- Add half of the maple syrup (or brown sugar) and whisk again. Make sure that the cornstarch dissolves in the maple syrup with no lumps. If using brown sugar, make sure the cornstarch mixes well with the sugar, and there are no large lumps.
- Whisk in the remaining maple syrup or sugar.
- Add the eggs, yolk, and vanilla. Whisk until the eggs are mixed in very well and there are no traces of egg yolks.
- Add the pumpkin and stir with a whisk to combine.
- Finally, add the evaporated milk and mix until there are no streaks of evaporated milk and the filling looks smooth and homogenous.
- OPTIONAL - If you want your pumpkin pie to have a vibrant color, add a couple of drops of red and egg yellow gel food coloring and whisk to mix. This is optional, and only because the color of some pumpkin purees might become dull when using spices and brown sugar.
- The filling is now ready.
Blender method
- In a blender jug or tall jug (for stick blender), place the spices, salt, cornstarch, maple syrup, or brown sugar. Followed by the vanilla, pumpkin puree, and evaporated milk. Blend the ingredients until smooth - in a blender or with a stick blender.
- Next, add the eggs and yolk, and blend again for a few seconds until the eggs are mixed in. Be careful not to blend for too long, as this will introduce more air into the filling.
- OPTIONAL - If you want your pumpkin pie to have a vibrant color, add a couple of drops of red and egg yellow gel food coloring and whisk to mix. This is optional, and only because the color of some pumpkin puree might become dull when mixed with spices and brown sugar.
- Let the filling rest at room temperature for a few minutes, or in the fridge for longer.
- The pumpkin pie filling is now ready.
Baking the pumpkin pie
- Once the pumpkin pie crust is par-baked, let it cool slightly. While the crust is warm or even at room temperature, pour the pumpkin pie filling into the crust.
- Use a toothpick or wooden skewer or a flat knife to swirl the filling. This is to remove any excess air in the filling. Make sure not to scrape the bottom and create a hole in the crust.
- You can also knock the pie dish against your kitchen counter a few times, firmly, to remove any excess air.
- Return the pie into the preheated oven. Place it in the preheated baking tray at the bottom third of the oven.
- Bake the pie for a further 45 - 50 minutes, until almost done. Cover the crust with a silicone pie shield or foil pie shield if it is browning too fast. Rotate once, halfway through baking time, if needed
- OPTIONAL - While the pie is baking, whisk the egg yolk with 2 tbsp of water or milk. Keep it covered until needed. When the pie is almost done baking, quickly open the oven door and remove the crust shield and brush the crust with the egg yolk wash. Bake for a further 5 - 10 minutes until the crust is shiny and caramelized, and the pumpkin pie filling has an internal temperature of 175°F / 80°C. The filling should be set all around, but the middle will jiggle ever so slightly.
- If you want to skip the final egg yolk wash on the crust, then bake the pumpkin pie for a total of 50 - 55 minutes, until the pie is done.
- Remove the pie from the oven and let it cool down. The pie will continue to cook for a few minutes outside of the oven too.
- Once the pumpkin pie is almost at room temperature, it can be transferred to the fridge (uncovered, or vented). When the pie is at room temperature, it can be covered with plastic wrap or foil. This is to avoid condensation that can pool on top of the pie filling as it sits in the fridge.
- Chill for at least 4 hours before serving.
Sugar coated pie crust bites (optional - for topping)
- Roll out an extra portion of pie dough into a rectangle (or circle - whichever is easiest). Place this on parchment paper.
- Brush one side with an egg wash and sprinkle raw sugar to coat.
- Flip the dough over and repeat with the egg wash and sugar.
- Use a pizza cutter or knife to cut the dough into any sized pieces you like. You can even cut shapes with a cookie dough cutter.
- Keep the dough on the parchment paper and place it in the fridge or freezer to chill.
- Preheat oven to 375°F / 191°C.
- Place the cut pieces of dough on a parchment paper-lined baking tray with some space in between the pieces.
- Bake in the preheated oven for about 15 - 25 minutes, or until the pie crusts are golden brown in color. The bake time will depend on the size of the cut pieces and their thickness.
- Once baked, remove from the oven and let them cool slightly. Then transfer to a wire rack to cool down completely. The underside of the pie crust pieces should be caramelized.
Serving suggestions
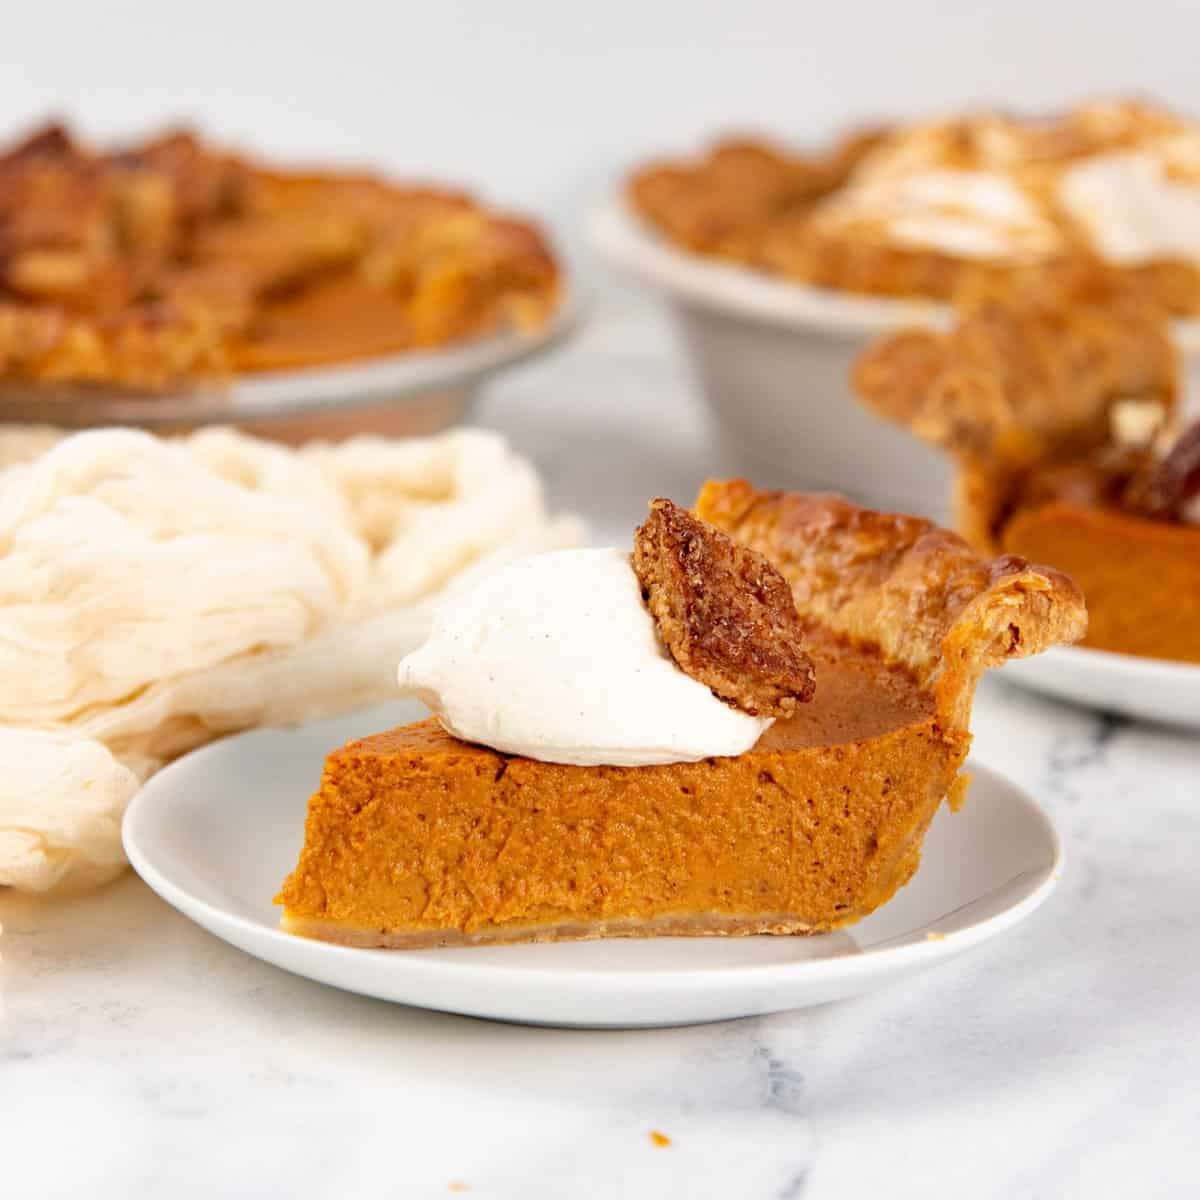
- Serve the pumpkin pie as is, or top with whipped cream or meringue. You can also serve the pumpkin pie with whipped cream on the side.
- If you used meringue, torch the meringue before serving.
- Pile up the pie crust bites in the middle OR serve them on the side.
Notes
- If you're not comfortable making your own pie crust, you can absolutely use a store-bought pie crust. This will make the recipe even easier.
- In my crustless pumpkin pie, I only add 100 g of sugar. Some of my readers love that it's not too sweet, while some prefer it to be sweeter.
- So in this recipe, I use 150 g of sugar. However, you can absolutely reduce the amount of sugar down to 100 g. I prefer about 120 g brown sugar or about 150 mL of maple syrup.
- You can also use white sugar or honey.I have not tried this pumpkin pie recipe with sugar substitutes. However, I have had readers use coconut sugar and monk sugar (1:1 sugar substitute) with success for the pumpkin pie filling.
- Substitute the evaporated milk with an equal amount of coconut cream (1 ½ cups).
- 1 ½
- 1 ½
- Substitute the evaporated milk with,
- Make a crustless pumpkin pie.OR make a gluten free crust with gluten free flour.
- I followed this recipe for a vegan pumpkin pie. However, I made the following changes (per 1 pie) -
- Heavy cream
- Condensed milk - to use condensed milk, eliminate both the evaporated milk AND the maple syrup / brown sugar.
- Coconut cream (for dairy free option).
- I used my own pie crust recipe, and substituted the butter with vegan butter, and par-baked it as well.
- Instead of 210 g of sugar (white and brown sugar), I only add about 130 g of brown sugar. I've also added up to 150 g, and found it a little too sweet compared to the other pumpkin pie versions I made.
- I also added 40 g cornstarch which is 4 packed tbsp.
- The spice mix I used for the vegan pie is the same one that I use in this recipe here, but you can follow that other recipe for that too, or use store-bought pumpkin pie spice.
Nutrition Information
Show Details
Serving
1slice
Calories
442kcal
(22%)
Carbohydrates
55g
(18%)
Protein
8g
(16%)
Fat
20g
(31%)
Saturated Fat
12g
(60%)
Polyunsaturated Fat
1g
(6%)
Monounsaturated Fat
6g
(30%)
Trans Fat
1g
(50%)
Cholesterol
100mg
(33%)
Sodium
296mg
(12%)
Potassium
385mg
(8%)
Fiber
3g
(12%)
Sugar
29g
(58%)
Vitamin A
8919IU
(178%)
Vitamin C
3mg
(3%)
Calcium
197mg
(20%)
Iron
2mg
(11%)
Nutrition Facts
Serving: 8servings
Amount Per Serving
Calories 442 kcal
% Daily Value*
| Serving | 1slice | |
| Calories | 442kcal | 22% |
| Carbohydrates | 55g | 18% |
| Protein | 8g | 16% |
| Fat | 20g | 31% |
| Saturated Fat | 12g | 60% |
| Polyunsaturated Fat | 1g | 6% |
| Monounsaturated Fat | 6g | 30% |
| Trans Fat | 1g | 50% |
| Cholesterol | 100mg | 33% |
| Sodium | 296mg | 12% |
| Potassium | 385mg | 8% |
| Fiber | 3g | 12% |
| Sugar | 29g | 58% |
| Vitamin A | 8919IU | 178% |
| Vitamin C | 3mg | 3% |
| Calcium | 197mg | 20% |
| Iron | 2mg | 11% |
* Percent Daily Values are based on a 2,000 calorie diet.
Genuine Reviews
User Reviews
Overall Rating
5
4 reviews
Excellent
Other Recipes
You'll Also Love