Easy Brioche Buns
User Reviews
5
Easy Brioche Buns
Description
Easy Brioche Buns start with activating yeast in warm milk and honey, then mixing in eggs, vanilla, sugar, flour, and salt to build a dough. The dough is then kneaded, gradually incorporating butter in several portions to develop a smooth, elastic dough with a rich, tender crumb. Proper kneading and proofing are essential to develop gluten and achieve the brioche’s characteristic soft texture.
After kneading, the dough proofs until doubled; proofing can be aided by placing the covered dough inside an oven with just the light on to provide gentle warmth. The dough is divided into portions for buns or sliders, shaped, and proofed again until nearly touching. The final baked buns are golden, soft, and slightly sweet with a delicate crumb.
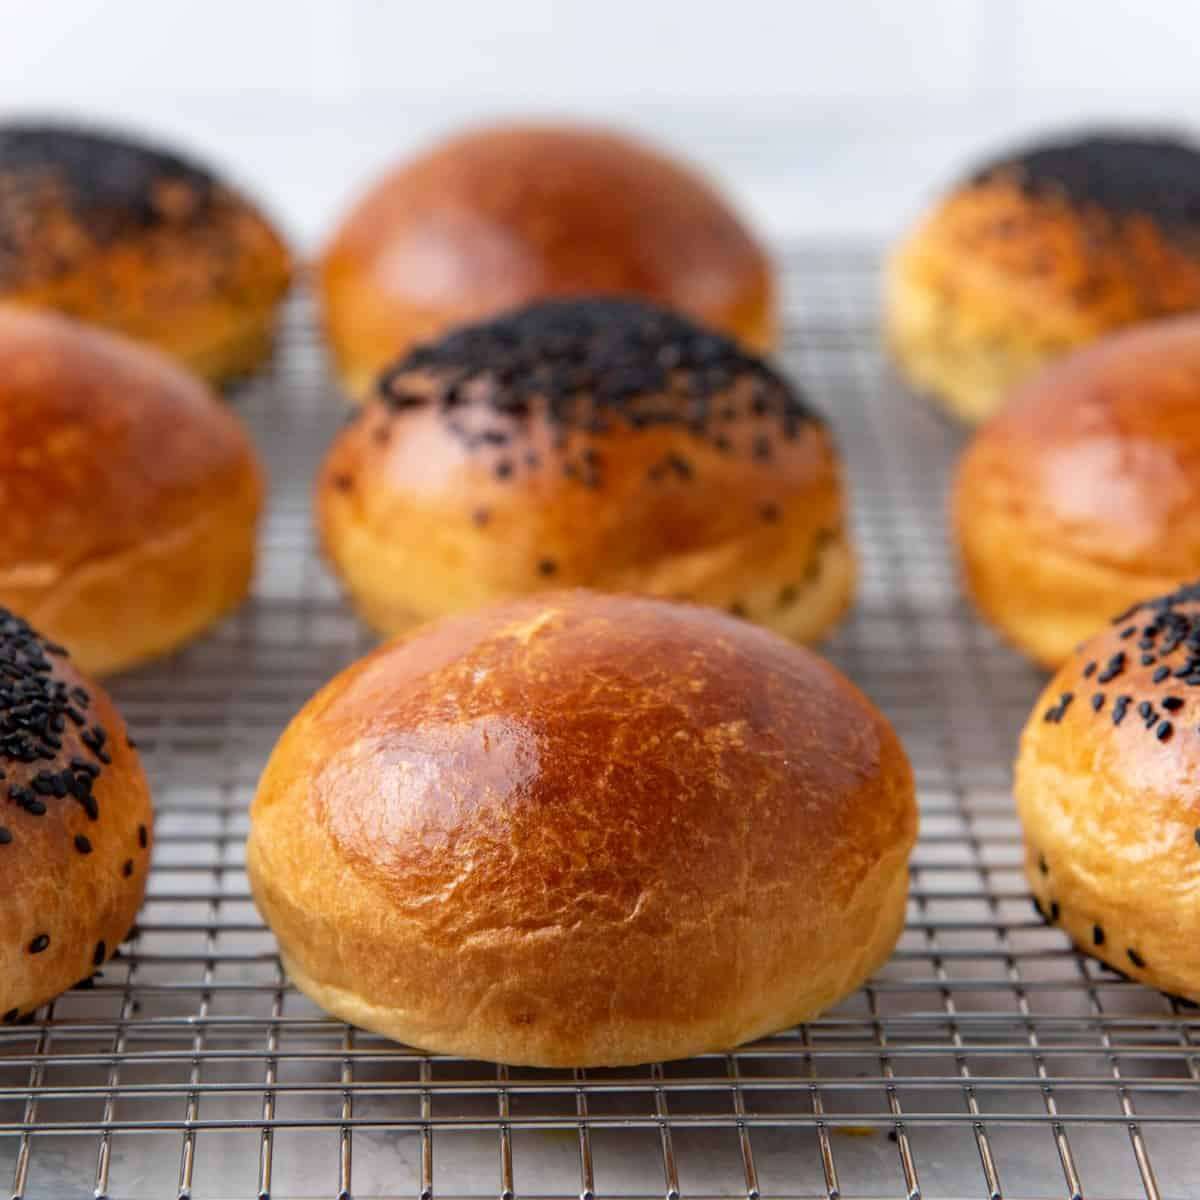
These buns can be topped with egg wash and seeds for added texture and flavor. The recipe includes guidance on judging proper proofing by indentation and bounce, helping prevent under- or over-proofing. The finished buns are suitable for slider-sized portions or larger sandwich buns.
Ingredients
- 120 mL milk ½ cup, around 110 F, warm
- 9 g active dry yeast about 2 ½ tsp
- 10 mL honey
- 4 egg large
- 2 egg yolks from large eggs
- 10 mL vanilla 2 tsp
- 60 g sugar 5 tbsp, granulated white
- 500 g all-purpose flour 17.6 oz (weighed) OR 4 cups + 2 tbsp, measured by spoon and level method
- 10 g salt 1 ½ tsp, fine sea salt
- 250 g butter roughly divided into four portions (1 cup + 2 tbsp) / 8.8 oz, unsalted, very soft
To brush / sprinkle on top
- 1 egg whisked, for the egg wash
- sesame seeds (optional)
- everything bagel seasoning (optional)
Instructions
DAY ONE
Making the dough
- Measure all the ingredients.
- Add the milk, yeast and honey into the mixing bowl and whisk gently to combine. Set aside for 10 minutes to allow the yeast to activate.
- Add the eggs and yolks, vanilla, and sugar, and whisk gently to break the egg yolks.
- Add the flour and sea salt, and mix with a spatula or dough whisk to form a scraggly dough.
- With the dough hook attachment, knead the dough on speed 2 or 3 for about 3 - 5 minutes.
- Add the first portion of butter, in increments, after the first minute of kneading. Allow the butter to be mixed well into the dough. This should take about 1 - 2 minutes.
- Repeat with the other 3 portions of butter, kneading the dough for about 2 minutes after each addition.
- Make sure to stop the mixer to scrape down the sides of the bowl (and the bottom) between adding butter and kneading. You will have incorporated all the butter in about 9 - 10 minutes of kneading time.
- Once all the butter is incorporated, scrape down the sides and bottom of the bowl, and knead the dough for a further 5 - 20 minutes on speed 5 or 6.
- The dough will have been kneaded enough when it can be lifted fairly cleanly off the bottom of the bowl when picked up with the dough hook. It will be very soft and tacky to the touch, but shouldn’t stick to your fingertips. Rather than strictly going by time, knead the dough until you have reached this consistency.
- Flour your work surface, and turn the dough out onto the floured surface. Lightly flour your hands and the surface of the dough to prevent the dough from sticking to your palms. Then flatten the dough with your hands to deflate.
- Fold in the edges of the dough towards the middle and gently press them into the dough (see pictures in my brioche bread loaf post for more information). Carefully flip the dough over, and then with the heel of your palms, shape the dough to form a tight ball.
- Carefully pick up the dough ball and place it back in the mixer bowl (or another large bowl).
- Let it rise until it has doubled in size, in a warm place (72°F), for about 1 hour.
- Turn the proofed dough out onto a lightly floured surface, and fold in the edges again as before towards the middle and press them in. Carefully flip the dough over (seam side down now). Tighten the dough into a ball with a smooth, taut surface (using the edges of your palms). Transfer the dough into the mixer bowl again.
- Cover and let it chill in the fridge for at least 8 hours, or up to 24 hours.
DAY TWO
Portioning the dough
- Remove the chilled dough from the fridge. The dough will be much easier to work with now.
- Line a few baking trays with parchment paper. Keep a bowl of flour, a scale, and a dough cutter ready.
- Turn the dough out onto a lightly floured surface. Deflate the dough by flattening it lightly.
- Measure the weight of the dough, and then divide it into 16 pieces (about 75 g per portion).
- Each portion will bake into a burger bun that is 9 - 9.5 cm in diameter. Please see the table in the post for different sizes and yields.
Shaping the dough
- Place each dough portion on your work surface, with the smooth side down. Fold in the edges towards the middle. Pinch the seams together.
- Dip the smooth side of the dough in a little flour. Carefully flip the dough over, and then using a cupped palm, and with the seam side down, roll the dough portion on your work surface until you get a smooth dough ball.
- Place the smooth, rolled dough on the parchment paper-lined baking tray; 6 buns on a baking tray plus 2 more on another tray.
- Repeat with the other dough portions to get 16 smooth dough balls.
- After arranging the dough balls on your baking trays, flatten them slightly. Cover the buns loosely with plastic wrap. This is important to prevent a skin from forming on the dough as it proofs.
Proofing and baking
- Proof the bread in the covered loaf pans for about 2 hours at room temperature, or until doubled in size. Preheat the oven to 350°F / 180°C before baking the buns. You can check if the buns are proofed by doing the indentation test (see recipe notes).
- Once proofed, brush the tops with an egg wash. Optional - sprinkle sesame seeds on top. For more flavor, you can sprinkle everything bagel seasoning as well.
- Bake in preheated oven until golden brown on top, and the internal temperature registers 190°F / 88°C. This can take about 10 - 12 minutes.
- Remove from the oven and let the buns cool slightly.
- Transfer the buns to a wire rack and let them cool down to room temperature. They’re ready to be served now.
- I prefer to bake one tray at a time. But you can bake two at a time as well, just make sure to switch the tray positions halfway through the baking time. To prevent over-proofing, refrigerate the remaining baking trays with the proofed buns (still covered in plastic wrap) until they're ready to be baked.
Notes
- Use a warm environment such as an oven with the light on to proof the dough if your kitchen is cool.
- The dough's readiness can be judged by pressing a finger into it: slight slow bounce back indicates proper proofing.
- Divide the dough into about 24 portions for slider-sized buns (~50 g each).
- Bake at 350°F (180°C) until tops are golden and internal temperature reaches 190°F (88°C).
Nutrition Information
Show DetailsNutrition Facts
Serving: 16buns
Amount Per Serving
Calories 274 kcal
% Daily Value*
| Serving | 1bun | |
| Calories | 274kcal | 14% |
| Carbohydrates | 29g | 10% |
| Protein | 6g | 12% |
| Fat | 15g | 23% |
| Saturated Fat | 9g | 45% |
| Cholesterol | 100mg | 33% |
| Sodium | 241mg | 10% |
| Potassium | 71mg | 2% |
| Fiber | 1g | 4% |
| Sugar | 5g | 10% |
| Vitamin A | 494IU | 10% |
| Calcium | 26mg | 3% |
| Iron | 2mg | 11% |
* Percent Daily Values are based on a 2,000 calorie diet.
User Reviews
Overall Rating
5
You'll Also Love