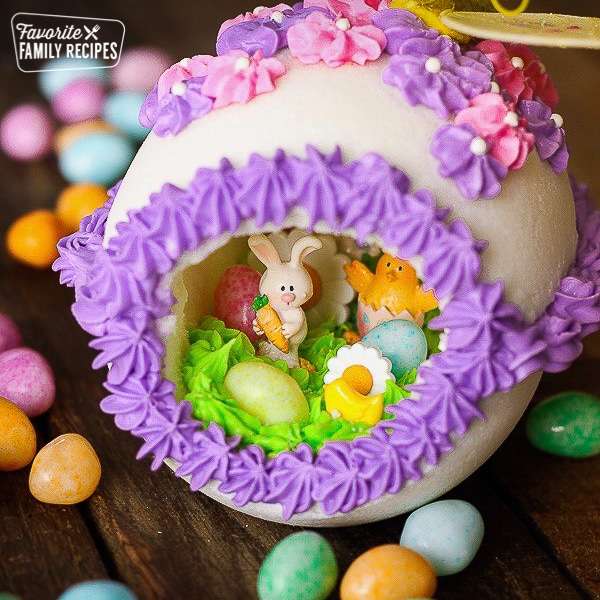
Panoramic Easter Eggs
User Reviews
5
Panoramic Easter Eggs
Description
Panoramic Easter Eggs use whipped egg white combined thoroughly with granulated and powdered sugar until the mixture resembles damp beach sand. Packing this mixture firmly into egg molds creates firm, smooth egg halves after inversion and mold removal. The fine texture of the sugar and careful pressing prevent cracks and gaps, ensuring a clean finished shape.
Coloring can be done by adding food coloring to the egg white before mixing with sugar, noting that the sugar dilutes the color intensity so stronger shades may be needed to achieve desired hues. After molding, the eggs can be decorated with royal frosting designs, jelly beans, and miniature Easter-themed figurines to create detailed decorative pieces.
These sugar eggs are solely ornamental and not intended for eating. They make colorful centerpieces or window decorations during the Easter season and can be stored covered to preserve their structure.
Ingredients
- 1 egg white
- Food Coloring optional
- 3 1/2 cups granulated sugar
- 1/2 cup powdered sugar
- royal frosting
- jelly beans
- tiny Easter figurines and decorations
Instructions
- Whisk the egg white until it becomes kind of foamy. In a separate bowl, mix together the granulated and powdered sugars so they’re mixed well. Pour the egg white into the sugars and begin stirring.*
- At first it will seem like it won't get wet enough, but keep stirring until it becomes like damp beach sand.
- Once your sugar mixture is ready, start filling your egg mold. With each scoop, pack down firmly. You want the egg to be smooth, so press down on the sugar to prevent any small gaps or cracks from forming. If you have excess sugar and want to make more eggs, keep it in a bowl and place a damp paper towel directly over the sugar to prevent it from drying out.
- Place a stiff piece of cardboard directly on the top of the mold. Bracing one hand on the cardboard and the other underneath the mold, quickly flip it upside-down so that the egg halves are now resting on the cardboard. Quickly remove the mold—now you should have two perfect sugar egg halves.
- At this point, the egg halves need to dry out a little before you can use them. You can let them sit at room temperature for about 6-7 hours, or you can put them in a 200-degree oven for 15-30 minutes (depending on the humidity and elevation where you live). Once the eggs have started to set, they need to be hollowed out. It is important to do this when the outside is hard, but the insides are still soft. Once the egg has fully set, it cannot be reshaped! Pick up the egg half, hold it in the palm of one hand and use a spoon to scrape out the moist sugar. Continue to scrape the interior of the egg until you have a sugar shell that is about 1/2-inch thick. You want it to be as thin as possible, while still being sturdy enough to hold together.Scrape out the interior of the other egg half. CAREFULLY use a serrated knife to slice off the tip of each egg, this will be the hole you look through to see the panorama so make it about the size you would like. Be careful not to apply too much pressure and cause the egg to collapse or crack. Continue to gently whittle/sand away to front of the egg until the two halves match. At this point the eggs need to dry out further before they can be completed. I would recommend letting them dry out overnight.
- Once the egg halves are dry and very hard, you can decorate the inside with a beautiful Easter scene. Pipe a small amount of royal icing (click HERE for recipe) into the bottom portion of the egg half. This is to anchor everything else you add. Add a layer of green-tinted coconut or Easter grass, if desired, and press gently to adhere it to the frosting. Add little figurines, pictures, buttons, small candies, or sugar decorations. It is easiest to add a dab of royal icing to the back or bottom of your decorations to help them stick. Now it is time to glue the two halves of the egg together. Pipe a thin line of royal icing (or you can use a hot glue gun) around the lip of the bottom half of the egg. Press the top half down onto the bottom, making sure that they line up evenly. Run your finger around the seam where the eggs meet to remove any excess frosting. You want to do this right away so that it will not begin to harden into unsightly shapes. Allow the egg to sit for about 30 minutes, until the frosting has hardened enough to move the egg without damaging it.
- Time to put the finishing touches on your egg! Pipe a decorative border around the seams where the two egg halves were joined together. Also pipe a border around the opening of the window, to better frame the scene inside and to hide any uneven edges. If you have frosting flowers or other decorations for the outside of the egg, now is the time to put them on. Use a small dab of royal frosting to secure them to the egg. Decorate to your desire with any additional frosting.
Notes
- Do not consume panoramic Easter eggs as they are for decorative purposes only.
- Add food coloring to the egg white before mixing with sugar; use darker shades to account for color dilution from sugar.
- Press sugar mixture firmly into molds to avoid cracks and ensure smooth egg surfaces.
Nutrition Information
Show DetailsNutrition Facts
Serving: 2Serving
Amount Per Serving
Calories 1479 kcal
% Daily Value*
| Calories | 1479kcal | 74% |
| Carbohydrates | 380g | 127% |
| Protein | 2g | 4% |
| Fat | 1g | 2% |
| Sodium | 29mg | 1% |
| Potassium | 24mg | 1% |
| Sugar | 379g | 758% |
| Iron | 0.2mg | 1% |
* Percent Daily Values are based on a 2,000 calorie diet.
User Reviews
Overall Rating
5
You'll Also Love