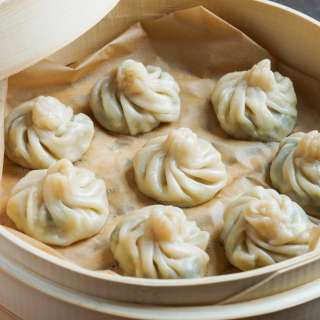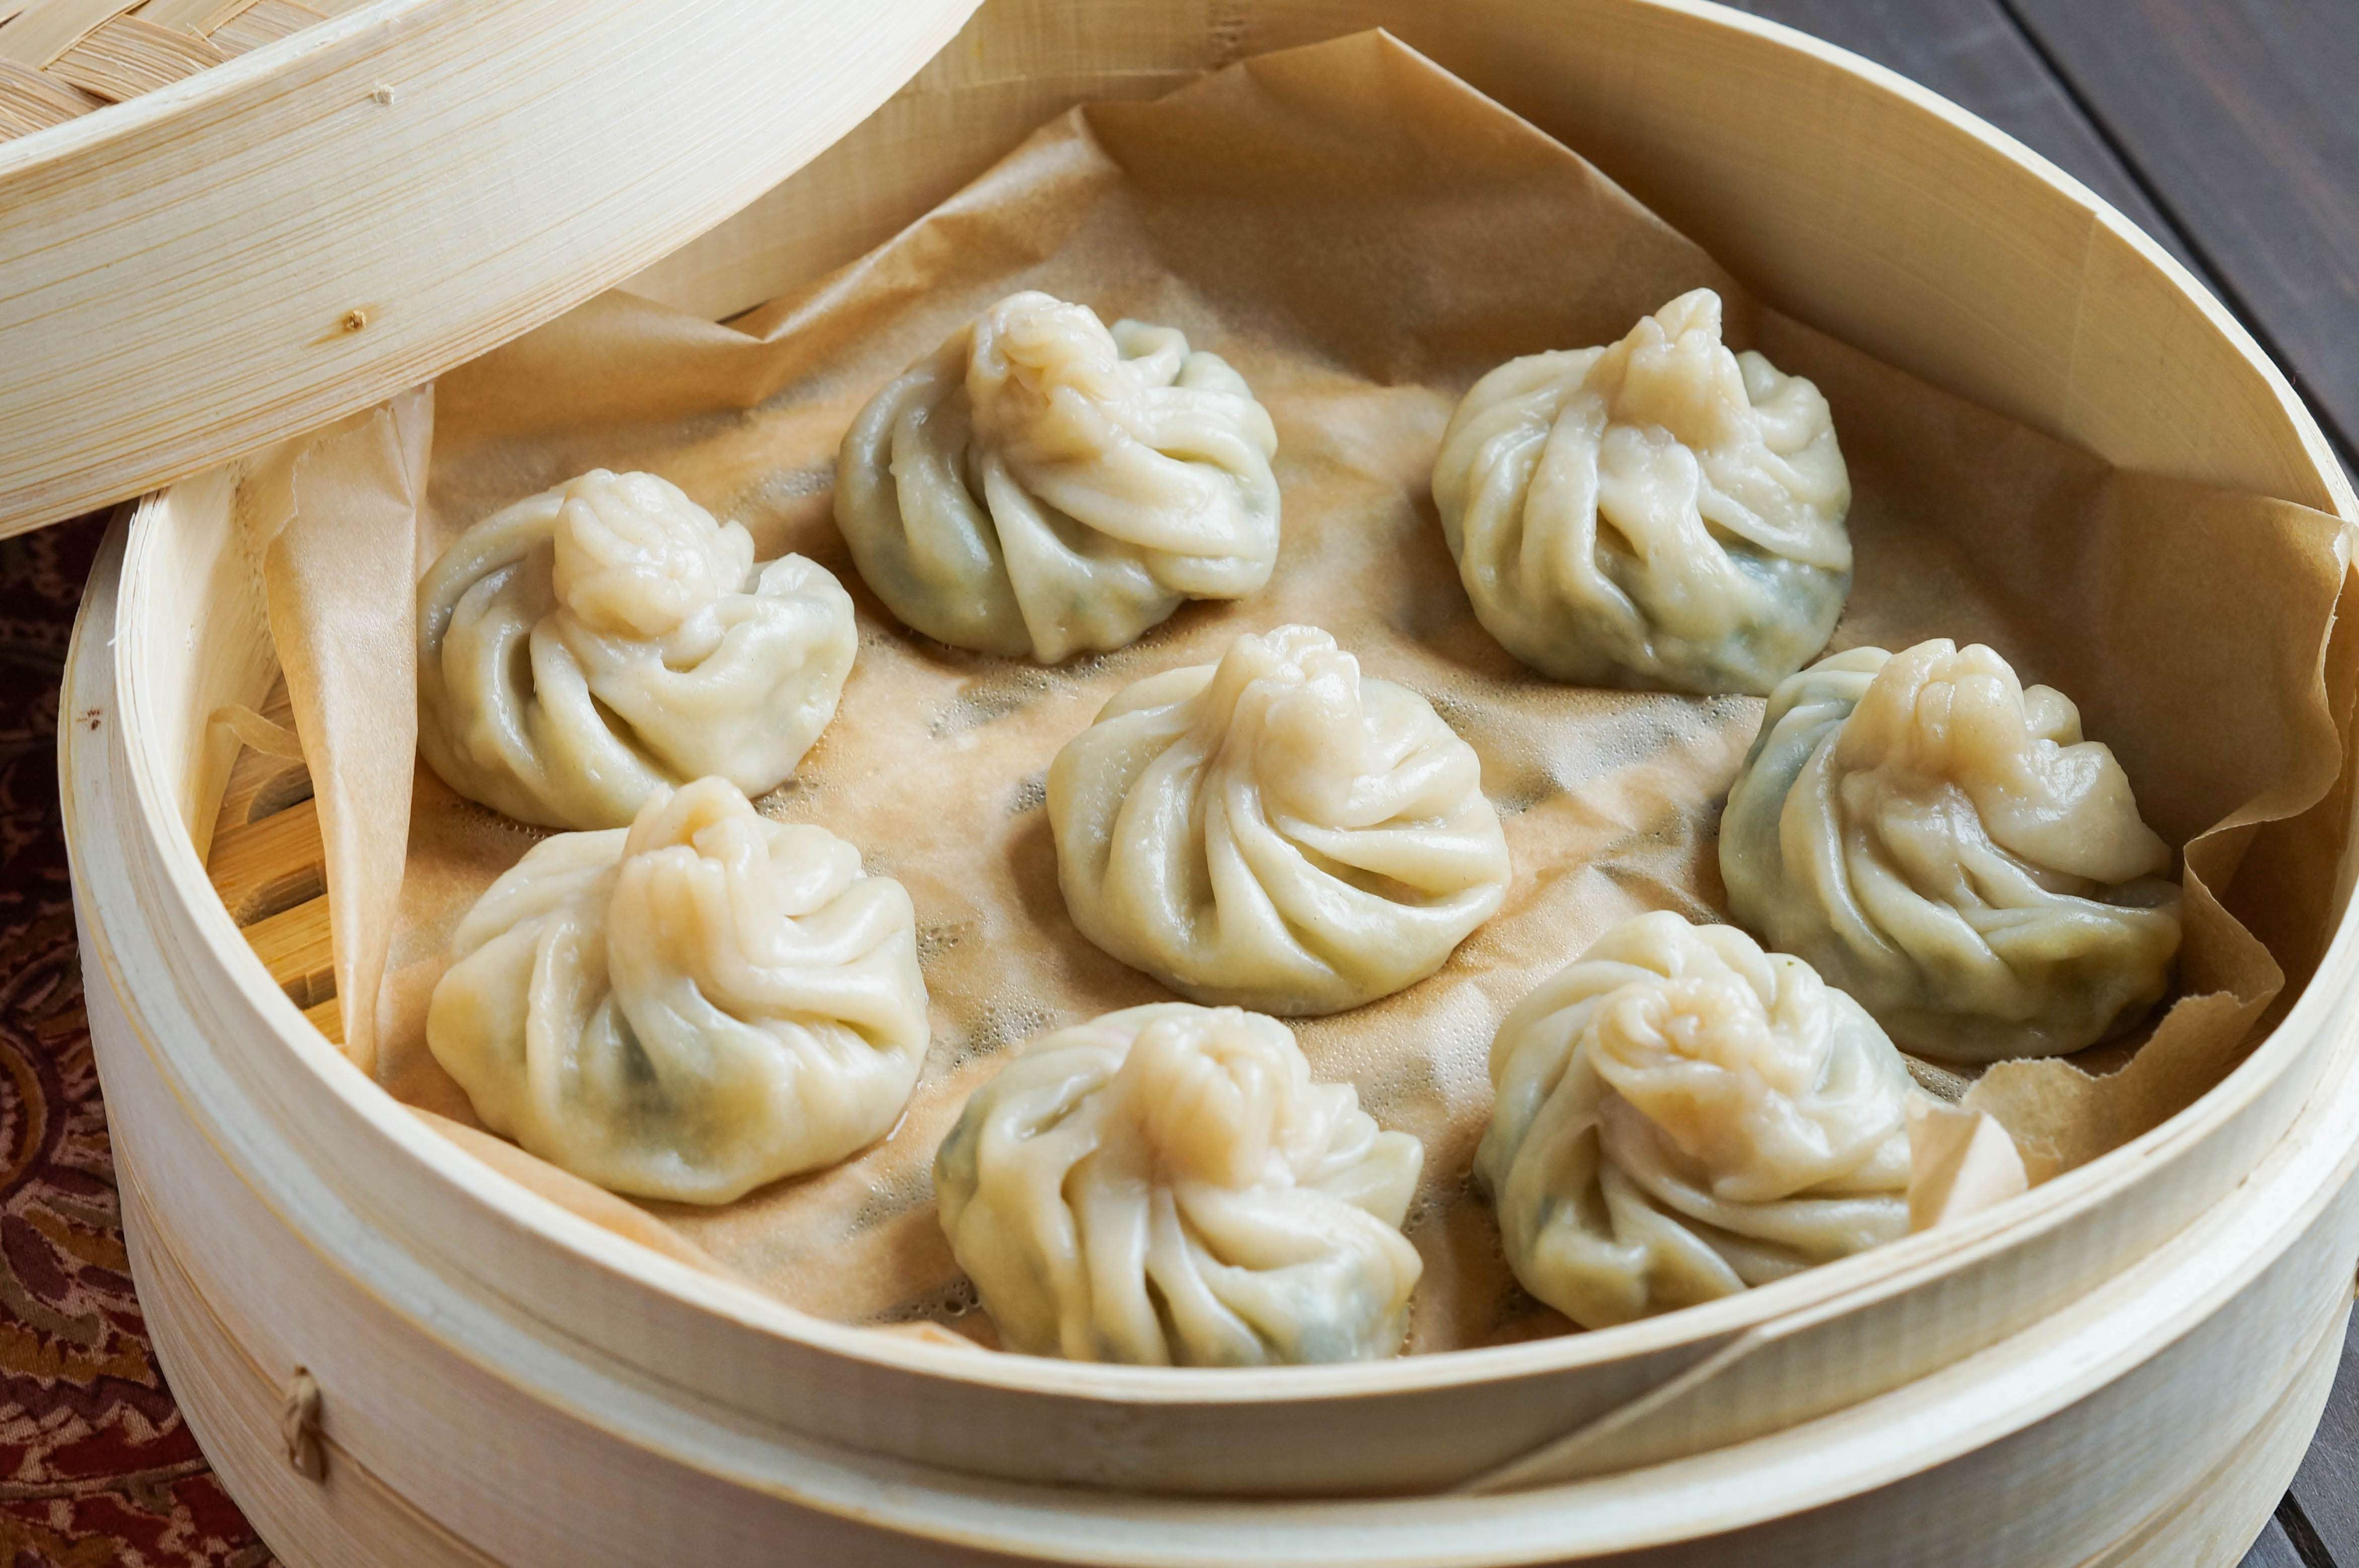
Tarkari Momo (Nepalese Vegetable and Cheese Dumplings)
User Reviews
0.0
0 reviews
Unrated
-
Prep Time
1 hr
-
Cook Time
mins
-
Additional Time
1 hr
-
Total Time
2 hrs 45 mins
-
Servings
32 Dumplings
-
Course
Main Course
Tarkari Momo (Nepalese Vegetable and Cheese Dumplings)
Report
A recipe for Tarkari Momo (Nepalese Vegetable and Cheese Dumplings) from the cookbook, Asian Dumplings.
Share:
Ingredients
Spicy Roasted Tomato Sauce:
- 3/4 pound ripe tomatoes
- 1 medium-hot red chile such as cayenne, fresno, holland, or jalapeño
- 1 clove garlic chopped
- 2 teaspoons chopped fresh ginger
- 1/4 teaspoon salt
- 3 tablespoons water
- 1 teaspoon fresh lime or lemon juice optional
- 2 1/2 tablespoons finely chopped fresh cilantro or mint leaves
- 1/4 teaspoon ground, toasted cumin seed or Sichuan peppercorn optional
Basic Dumpling Dough:
- 10 ounces (2 cups) unbleached all-purpose flour
- 3/4 cup just-boiled water
Tarkari Momo:
- 4 cups whole milk
- 2 tablespoons fresh lemon juice or 1 1/2 tablespoons distilled white vinegar or cider vinegar
- 3 cups lightly packed chopped green cabbage
- 2 cups lgihtly packed coarsely chopped spinach
- 3 tablespoons ghee or unsalted butter
- 1/2 cup finely chopped yellow onion
- 1 large clove garlic minced
- 1 1/2 teaspoons minced fresh ginger
- 1 large medium-hot red chile such as holland or fresno, finely chopped
- 1/2 teaspoon Sichuan peppercorn toasted in a dry skillet for 2-3 minutes until fragrant, then crushed with a mortar and pestle
- 1/4 teaspoon ground cumin
- 2 large scallions (white and green parts) chopped
- 1/3 cup chopped fresh cilantro
- 1 teaspoon salt
- 2 teaspoons cornstarch dissolved in 1 tablespoon water
Instructions
To make the Spicy Roasted Tomato Sauce:
- Position an oven rack about 4 inches away from the broiler. Put the tomato and chile atop a piece of aluminum foil on a baking sheet and broil for about 6 minutes, or until the skins have pulled away and are a bit charred. Turn over and broil the other side for another 2 minutes. Continue, if necessary, to roast and char all over. Remove from the oven and set aside to cool.
- Remove and discard the skins from the tomatoes and chile. Cut away the stems and, if you like less heat, scrape out and discard the chile seeds. Coarsely chop and set aside.
- Combine the garlic, ginger, and salt in a mortar and pound with the pestle into a fragrant paste. Add the chile and pound to a rough texture. Add the tomatoes and gently mix to break the tomato apart. It will remain chunky. Transfer to a bowl, then stir in the water, lime juice, cilantro, and cumin. (For a finer texture, use an electric mini-chopper and process in stages to ensure a smooth consistency. Blend the water and lime juice with the tomato. Stir in the cilantro and cumin to finish.)
- Set the sauce aside for 30 minutes to blend the flavors. Taste and add extra salt for depth, lime juice to cut the heat, or water to thin out the sauce. Aim for a medium-hot tang. This sauce is best enjoyed the day you prepare it, but it can be refrigerated overnight and returned to room temperature before serving.
To make the basic dumpling dough:
- To prepare the dough in a food processor, put the flour in the work bowl. With the machine running, add 3/4 cup of water in a steady stream through the feed tube. As soon as all the water has been added, stop the machine and check the dough. It should look rough and feel soft but firm enough to hold its shape when pinched. If necessary, add water by the teaspoon or flour by the tablespoon. When satisfied, run the machine for another 5 to 10 seconds to further knead and form a ball around the blade. Avoid overworking the dough.
- Alternatively, make the dough by hand. Put a bowl atop a kitchen towel to prevent it from slipping while you work. Put the flour in the bowl and make a well in the center. Use a wooden spoon or bamboo rice paddle to stir the flour while you add 3/4 cup water in a steady stream. Aim to evenly moisten the flour. It is okay to pause to stir or add water- it is hard to simultaneously do both actions. When all the water has been added, you will have lots of lumpy bits. Knead the dough in the bowl (it is not terribly hot) to bring all the lumps into one mass; if the dough does not come together easily, add water by the teaspoon.
- Regardless of the mixing method, transfer the dough and any bits to a work surface; flour your work surface only if necessary, and then sparingly. Knead the dough (it is not hot) with the heel of your hand for about 30 seconds for machine-made dough, or about 2 minutes for handmade dough. The result should be nearly smooth and somewhat elastic; press on the dough; it should slowly bounce back, with a light impression of your finger remaining. Place the dough in a zip-top plastic bag and seal tightly closed, expelling excess air. Set aside to rest at room temperature for at least 15 minutes and up to 2 hours. The dough will steam up the plastic bag and become earlobe soft, which makes wrappers easy to work with.
- After resting, the dough can be used right away to form the wrappers. Or, refrigerate it overnight and return it to room temperature before using.
To assemble the Tarkari Momos:
- Put the milk in a heavy-bottomed saucepan and heat over medium-high heat, stirring frequently. Meanwhile, line a colander with a flour-sack towel, a piece of muslin, or four layers of cheesecloth.
- When the milk begins to boil, decrease the heat to prevent boiling over. Add the lemon juice, stirring gently for about 10 seconds, or until white curds start forming and separating from the clear green-yellow whey. Remove from the heat and strain through the fabric-lined colander. Rinse the curds under cold water at a medium flow for about 5 seconds, to cool slightly and remove residual tang.
- Gather up the towel around the curds, gently twisting to extract excess water. (If the cheese is still too hot,try again after it has hung for 10 minutes.) Tie up the corners of the towel, then hang the cheese to drain (I use the sink faucet) for 30 to 45 minutes, or until cool.
- Transfer the cheese to a bowl, then mash it into a crumble; there should be about 1 cup. Cover to prevent drying. The cheese can be made up to 4 days in advance and refrigerated.
- Half-fill a pot with water and bring to a boil over high heat. Add the cabbage. When the water returns to a boil, add the spinach, stirring to wilt it. Remove from the heat, drain the cabbage and spinach, rinse with cold water, then drain again. Expell excess water by squeezing batches of the vegetables in a towel or the same cloth used for making the cheese. Transfer to a bowl and set aside. There should be about 1 1/2 packed cups.
- Melt the ghee in a medium skillet over medium heat. Add the onion and cook for about 2 minutes, stirring occasionally, until soft and fragrantly sweet. Add the garlic, ginger, and chile, stirring for 30 seconds or until aromatic. Sprinkle in the Sichuan peppercorn and cumin, stirring for another 30 seconds, or until fragrant. Add the cabbage and spinach, and continue cooking for 1 to 2 minutes, until heated through. Stir in the cheese, scallions, and cilantro to combine. Sprinkle in the salt and mix well. Cook for about 1 minute to heat through.
- Give the cornstarch mixture a stir and add to the filling mixture. Gently stir and fold until the mixture coheres. Transfer to a bowl, partially cover, and set aside to cool completely before using. You should have about 2 cups. (Or, cover in plastic wrap, refrigerate overnight, and return to room temperature before proceeding.)
- Meanwhile, form 16 wrappers from half of the dough. Aim for wrappers that are about 3 1/4 inches in diameter. Remove the dough from the bag, turning the bag inside out if the dough is sticky. Put the dough on a lightly floured work surface and cut it in half. Put half back in the bag, squeezing out the air and sealing it closed to prevent drying.
- Roll the dough into a 1-inch thick log, and then cut it into 16 pieces. To cut even pieces, quarter the log first; the tapered end pieces should be cut a little longer than the rest. Weigh each piece of dough to be super precise if you like.
- To prevent the dough from sticking and to flatten it a bit, take each piece of dough and press one of the cut ends in flour, then flip it over and do the same on the other end; the dough can be sticky. You should end up with a disk roughly 1/4 inch thick. As you work, set the floured disks to one side of your work area.
- Next, flatten each dough disk into a thin circle that is about 1/8 inch thick, either with a tortilla press or with a heavy, flat-bottomed object. If you are using the tortilla press, open the press and lay a plastic square on the bottom plate. Center a disk of floured dough and cover with the other plastic square. Close the top plate, then fold the pressure handle over the top plate and press down. Use moderate pressure and press only once, or the resulting wrapper will stick to the plastic and be hard to remove.
- Fold back the pressure handle, open the top plate, and peel off the top plastic square. Then gently peel the wrapper off the bottom plastic square. Should the wrappr feel tacky, lightly swipe both sides on some flour before placing on the work surface.
- Without the tortilla press, put the floured disk between the plastic squares and press down with a heavy object to produce a circle about 1/8 inch thick. You may have to press more than once. Gently peel back the plastic from the wrapper.
- Regardless of method, repeat with the remaining dough pieces, setting them to one side of the work area as you finish them. It is okay to overlap the wrappers slightly.
- To finish the wrappers, take a wrapper and place it on the work surface, flouring the surface only as needed to keep the dough from sticking. Imagine a quarter-size circle in the center. This is what the Chinese call the "belly" of the wrapper. You want to create a wrapper that is larger than its current size but retains a thick belly. This ensures even distribution of the dough after the wrapper's edge has gathered and closed around the filling.
- To keep a thick belly, use the rolling pin to apply pressure on the outer 1/2-3/4 inch border of the wrapper, as follows. Try to roll the rolling pin with the flat palm of one hand while using the other hand to turn the wrapper in the opposite direction. Keep the thumb of the rotating hand near the center of the wrapper to guide the rolling pin and turn the wrapper.
- If the wrapper sticks to the work surface or rolling pin, pause to dust the wrapper with flour and then continue. If you cannot get a wrapper thin enough on the first try, set it aside to relax for about 1 minute, and then roll again. Should the wrapper tear or be hopelessly misshapen, roll up the dough, let it rest for a few minutes, then press it again and roll it out. Resembling a flat fried egg, the finished wrapper does not need to be a perfect circle.
- As you work, line up the finished wrappers on your work surface; if you need extra space, use a baking sheet lined with parchment and dusted with flour. A bit of overlapping is fine, but avoid stacking the wrappers.
- Before assembling the dumplings, line steamer trays and/or a baking sheet with parchment paper. (If you are making the dumplings in advance, or plan to freeze them, lightly dust the paper with flour to avoid sticking.) For each dumpling, hold a wrapper in a slightly cupped hand. Scoop up about 1 tablespoon of filling with a bamboo dumpling spatula, dinner knife, or fork and position it in the center of the wrapper, pressing and shaping a mound and keeping about 1/2 to 3/4 inch of wrapper clear on all sides. Use your fingers to pleat and pinch the edge together to enclose the filling and form a closed satchel. If that shape is too challenging, make the dumplings into half-moons, pea pods, big hugs, or pleated crescents.
- If you are steaming right away, place each finished dumpling in a steamer tray, sealed side up, and 1 inch away from the edge if you are using metal steamers. Repeat with the remaining wrappers, placing them in the steamer about 1/2 inch apart. If you don't have enough space on your steamer trays to steam all the dumplings at once, or if you are not steaming them right away, place the waiting ones on the prepared baking sheet, spaced a good 1/2 inch apart.
- Keeping the finished dumplings covered with a dry kitchen towel, form wrappers from the remaining dough and fill them.
- Assembled dumplings can be covered with plastic wrap, refrigerated for several hours, and cooked straight from the refrigerator. Or, freeze them on the baking sheet until hard (about 1 hour), transfer them to a zip-top plastic bag, pressing out excess air before sealing, and keep them frozen for up to 1 month; partially thaw, using your finigers to smooth over any cracks that may have formed, before steaming.
- To cook, steam the dumplings over boiling water for about 8 minutes, or until they have puffed slightly and become somewhat translucent. Remove each tray and place it atop a serving plate.
- Serve immediately with the sauce in a communal bowl for guests to help themselves. Enjoy with fork and spoon.
Genuine Reviews
User Reviews
Overall Rating
0.0
0 reviews
Unrated
Other Recipes
You'll Also Love


Baingan Bharta
Indian, Pakistani, Sri Lankan, Nepalese, Vegan, Bangladeshi, Maldivian, Bhutanese
5.0
(3 reviews)