Instant Pot Nishime
User Reviews
4.8
Instant Pot Nishime
Description
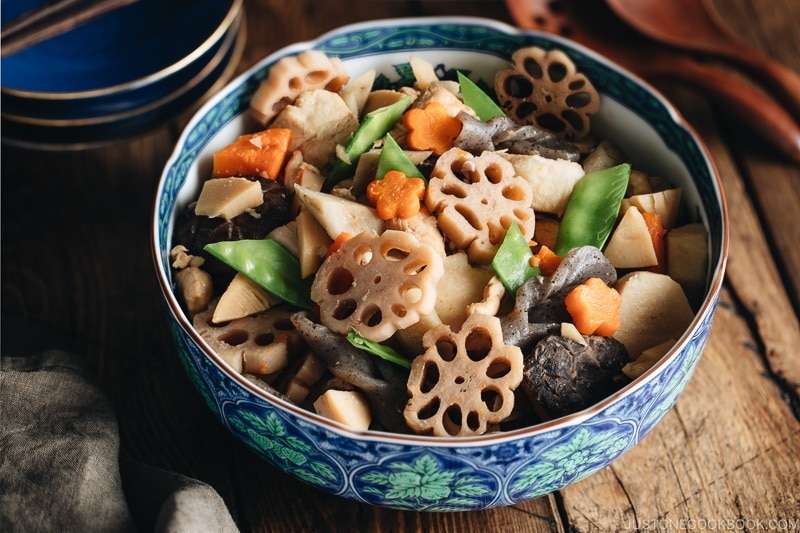
Instant Pot Nishime uses a homemade dashi broth enhanced by soaking dried shiitake mushrooms, delivering a clean yet deep umami base. Vegetables such as lotus root, taro, burdock root, carrots, bamboo shoots, and snow peas provide a range of textures from firm to tender. Boneless, skinless chicken thigh adds protein and richness. Cooking in the Instant Pot under pressure softens the hearty root vegetables efficiently while allowing flavors to meld. Seasonings include mirin for sweetness, sake for depth, soy sauce for saltiness, and a touch of sugar and salt to balance. Toasted sesame oil adds a subtle nutty aroma. The resulting dish is a comforting, subtly seasoned vegetable and chicken stew with clean, layered flavors typical of Japanese home-cooking.
Ingredients
For the Dashi (Japanese Soup Stock)
- 1 cup water (or use Awase Dashi or Vegan Dashi and skip the dashi packet)
- 1 dashi or use dashi powder in a pinch, packet
- 5 dried shiitake mushrooms
For the Nishime Ingredients
- 10 snow peas (1 oz, 30 g)
- ½ block konnyaku 4.5 oz, 130 g, aka konjac
- 1 bamboo shoot (6 oz, 170 g)
- 1 lotus root 6 oz, 170 g, aka renkon
- 1 carrot (6 oz, 170 g)
- 5 taro 9 oz, 250 g, aka satoimo
- 1 burdock root 8 oz, 220 g, aka gobo
- ¾ lb chicken thigh I used chicken tenders here; you can also combine different cuts; use plant-based meat or mushrooms for vegan/vegetarian, boneless, skinless
- 1½ Tbsp sesame oil toasted
For the Seasonings
- 1 Tbsp sugar
- 2½ Tbsp mirin
- 1 Tbsp sake
- 3 Tbsp soy sauce or use regular soy sauce, usukuchi (light-colored
- ½ tsp kosher salt Diamond Crystal brand
Instructions
Before You Start...
- If you will include this dish in your Osechi meal, I recommend cooking it 2 days before you plan to serve. For more helpful tips on planning your Japanese New Year feast, please read my A 5-Day Osechi Cooking Timeline blog post.
- Gather all the ingredients.
To Make the Dashi
- In a small saucepan, add 1 cup water and 1 dashi packet. Slowly bring it to a boil on medium-low heat, while gently shaking the bag a few times to release more flavor. Once boiling, lower the heat and cook for 1 minute. Then, turn off the heat. Tip: You can also make dashi using dashi powder.
- Remove the pot from the heat. Squeeze out the liquid and discard the dashi packet. Add 5 dried shiitake mushrooms to the dashi to rehydrate for 15 minutes.
To Prepare the Ingredients
- Remove the stem ends and tough strings of 10 snow peas.
- Cut ½ block konnyaku (konjac) crosswise into slices about ⅛ to ¼ inch (3 to 6 mm) thick. To make the tazuna konnyaku (optional), cut a lengthwise slit 1½ inches (3.8 cm) long in the center of each slice.
- Then, tuck one end of the slice through the slit. Push it in; then, pull out the end from the other side. The konnyaku will now be twisted on either side of the slit to resemble horse reins. Pull gently on both ends so the slice lays flat. Repeat with the remaining slices.
- Boil water in a saucepan over medium-high heat. Add a pinch of salt and blanch the snow peas for 30–60 seconds, until crisp but tender. Scoop them out of the boiling water and drain them in a sieve or transfer to a bowl of ice water to stop the cooking and set aside. Keep the water boiling.
- In the same boiling water, add the konnyaku and cook for 2–3 minutes to remove the odor (which is why you cook them after, and not before, the snow peas). Drain and set aside.
- Cut 1 bamboo shoot lengthwise into quarters. Then, cut each quarter in half crosswise so the tip end is about 1½ inches (3.8 cm) long. Slice the tip end lengthwise into slices ¼ inch (6 mm) thick. Finally, slice the bottom end into ¼-inch (6-mm) slices.
- Peel off the skin of 1 lotus root (renkon) with a vegetable peeler or knife. Then, cut the root in half crosswise.
- (Optional) If you want to make hana renkon (lotus root flowers), you can use my tutorial.
- Slice the lotus root crosswise about ¼ inch (6 mm) thick. Soak the slices in a bowl of water (or 2 cups water + 1 tsp vinegar to make the lotus root whiter).
- Peel 1 carrot. If you want to make flower-shaped carrot slices (optional), first slice the top 2 inches (5 cm) of the carrot into ¼-inch (6-mm) rounds and set aside until the next step. Then, cut the rest of the carrot using the rangiri Japanese cutting technique: Slice diagonally while rotating the carrot a quarter turn between cuts.
- (Optional) For the flower-shaped carrots, use a vegetable cutter to punch out a plum flower shape from the carrot rounds. Tip: Repurpose the carrot remnants by mincing them and using in fried rice or soup.
- To remove the skin of 5 taro (satoimo), slowly peel the tough skin with a sharp knife. It’s very tough, so I don’t recommend using a vegetable peeler. Tip: For taro, it’s recommended to peel the skin thick. It’s not considered wasteful to remove the skin with more flesh attached.
- Cut each peeled taro in half crosswise and soak in a bowl of water to get rid of the starch and astringent taste. Ideally, the taro should resemble a hexagon (with six sides) from the top view.
- Next, lightly scrape off the skin of 1 gobo (burdock root) with the back of your knife. (Unlike taro, you want to preserve the flesh as much as possible as the flavor of the gobo is right under the skin.) Cut the gobo using the rangiri Japanese cutting technique. Soak the pieces in a bowl of water to get rid of the starch and astringent taste.
- By now, the dried shiitake mushrooms should be soft and hydrated. Squeeze the liquid from the shiitake mushrooms into the soaking liquid. Next, strain this shiitake dashi in a fine-mesh sieve over a measuring cup. You will need 200 ml (about 1 cup minus 2 Tbsp).
- Discard the stems of the shiitake mushrooms. (Optional) Cut the edges of the shiitake caps to form a hexagon, which resembles a turtle shape and symbolizes longevity.
- Cut ¾ lb boneless, skinless chicken thigh into slanted pieces using the sogigiri Japanese cutting technique: Angle your knife back and diagonally (nearly parallel to the cutting board), and then slice the chicken. This method creates pieces of equal thickness and increased surface area, which allows the chicken to cook faster and absorb more flavors.
To Cook in an Instant Pot
- Press the Sauté button on your Instant Pot. When the inner pot is hot, add 1½ Tbsp toasted sesame oil.
- Next, add the chicken and stir to coat with the oil.
- When the chicken is no longer pink on the outside, add the lotus root, taro, gobo, and bamboo shoot. Stir to combine. Then, add the dashi.
- Next, add 1 Tbsp sugar, 2½ Tbsp mirin, 1 Tbsp sake, 3 Tbsp usukuchi (light-colored) soy sauce, and ½ tsp Diamond Crystal kosher salt.
- Mix the seasonings and ingredients together well. Then, add the carrot, konnyaku, and shiitake mushrooms (save the snow peas for garnish).
- Press Cancel to stop the Sauté mode. Then, close and lock the lid. Select Pressure Cook mode and cook for 3 minutes under High pressure.
- Make sure the steam release handle points to Sealing and not Venting. The float valve will rise when pressurized. When it’s finished cooking, the Instant Pot will switch automatically to the Keep Warm mode. Let the pressure release naturally.
To Serve
- Open the lid and gently mix the ingredients. Serve in individual bowls or in a large bowl, family-style. Garnish with snow peas (I cut each piece diagonally in half).
To Store
- Transfer the Nishime to an airtight container and let it cool completely. Store in the refrigerator for up to 5 days. The flavor will intensify as time passes, so consider reducing the amount of seasoning if you plan to serve it later. Nishime also freezes well, but the konnyaku texture will change, so I recommend removing them before freezing. Defrost overnight and reheat in a pot.
Nutrition Information
Show DetailsNutrition Facts
Serving: 6(as
Amount Per Serving
Calories 227 kcal
% Daily Value*
| Calories | 227kcal | 11% |
| Carbohydrates | 27g | 9% |
| Protein | 14g | 28% |
| Fat | 6g | 9% |
| Saturated Fat | 1g | 5% |
| Trans Fat | 1g | 50% |
| Cholesterol | 54mg | 18% |
| Sodium | 544mg | 23% |
| Potassium | 754mg | 16% |
| Fiber | 5g | 20% |
| Sugar | 6g | 12% |
| Vitamin A | 4837IU | 97% |
| Vitamin C | 20mg | 22% |
| Calcium | 65mg | 7% |
| Iron | 1mg | 6% |
* Percent Daily Values are based on a 2,000 calorie diet.
User Reviews
Overall Rating
4.8
You'll Also Love