Azuki Red Bean Ice Cream
User Reviews
4.5
Azuki Red Bean Ice Cream
Description
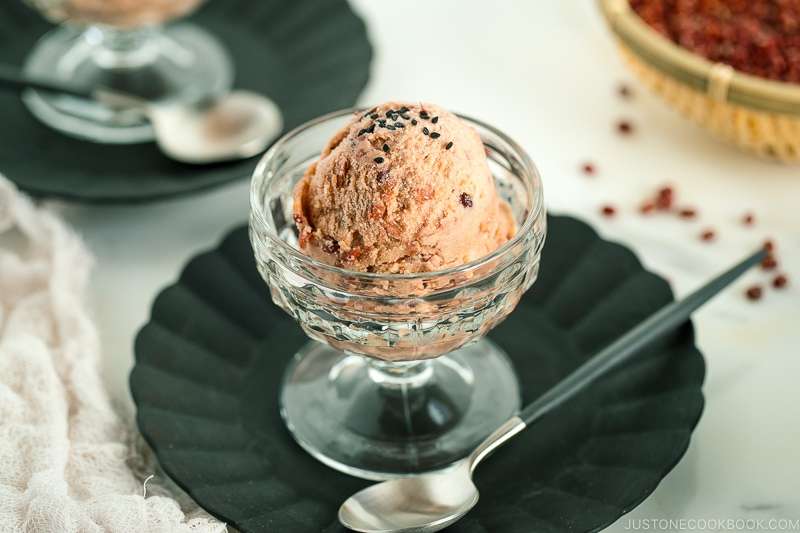
This Azuki Red Bean Ice Cream recipe uses whole milk and sugar dissolved gently over medium heat before incorporating sweet red bean paste, known as anko. Once combined, the mixture is cooled thoroughly in an ice water bath and refrigerated for several hours to develop flavor and chill uniformly.
After chilling, the base is churned in an ice cream maker, which requires a well-frozen bowl to ensure proper freezing and texture. The result is a creamy ice cream that balances gentle sweetness with the earthy, complex flavor of azuki beans. The texture is soft but firm enough to scoop.
The recipe suggests optional toasted black sesame seeds as a garnish, adding a contrasting nutty flavor and a subtle crunch that complements the red bean. This ice cream serves as a refined dessert, ideal for those interested in unique, bean-based sweets. Proper chilling of the ice cream base and ensuring the ice cream maker bowl is frozen in advance are key to achieving the desired texture.
Ingredients
- 1¼ cups milk please use whole milk as we don‘t use heavy cream in this recipe, whole
- ⅓ cup sugar (adjust to your taste)
- 15 oz red bean paste 1 can of ogura-an; or make my Homemade Red Bean Paste, sweet, aka anko
To Serve
- 2 tsp black sesame seeds optional, toasted
Instructions
- Gather all the ingredients.
- In a medium saucepan, combine 1¼ cups whole milk and ⅓ cup sugar.
- Stir and heat the mixture on medium heat. When the sugar is dissolved, add 15 oz sweet red bean paste (anko).
- Whisk the mixture until combined and turn off the heat.
- Prepare ice water in a large bowl. Place the pot of red bean mixture in the ice bath and let the mixture cool completely. Then put the lid on and store it in the refrigerator overnight or at least 4 hours.
- On the following day (or after 4 hours), set up your ice cream maker according to the instructions. My ice cream maker does not require freezing the bowl in advance but I need to run it for 15–20 minutes prior to making ice cream. Please make sure your ice cream bowl is frozen ahead of time. A bowl that isn’t completely frozen will take longer to freeze your ice cream and impact the finished product. If you make homemade ice cream on a regular basis, store your bowl in the freezer once it is clean. It will always be ready for your next batch of ice cream. If you don‘t have an ice cream maker, check out here.
- Pour the mixture into the ice cream machine. Make sure not to fill it more than about two-thirds of the way up. Start churning. Churning ice cream incorporates air into the finished product while it freezes, so you will need some extra room in your freezer bowl.
- The mixture will become thicker and creamier, about 25–30 minutes.
- Transfer the ice cream to an airtight container and flatten it with the silicone spatula. Cover the lid and put it in the freezer for at least 3–4 hours. Set freezer temperature to the coldest setting, so the ice cream freezes faster. Optional: Lay plastic wrap directly on top of ice cream and press down gently to prevent ice crystals from forming on top of the ice cream.
- Serve the ice cream and sprinkle with 2 tsp toasted black sesame seeds.
Nutrition Information
Show DetailsNutrition Facts
Serving: 3cups
Amount Per Serving
Calories 432 kcal
% Daily Value*
| Serving | 1cup | |
| Calories | 432kcal | 22% |
| Carbohydrates | 38g | 13% |
| Protein | 11g | 22% |
| Fat | 4g | 6% |
| Saturated Fat | 2g | 10% |
| Cholesterol | 10mg | 3% |
| Sodium | 100mg | 4% |
| Potassium | 137mg | 3% |
| Fiber | 7g | 28% |
| Sugar | 69g | 138% |
| Vitamin A | 160IU | 3% |
| Vitamin C | 52mg | 58% |
| Calcium | 143mg | 14% |
| Iron | 2mg | 11% |
* Percent Daily Values are based on a 2,000 calorie diet.
User Reviews
Overall Rating
4.5
You'll Also Love