Cantonese Steamed Custard Buns (Nai Wong Bao)
User Reviews
4.5
Cantonese Steamed Custard Buns (Nai Wong Bao)
Description
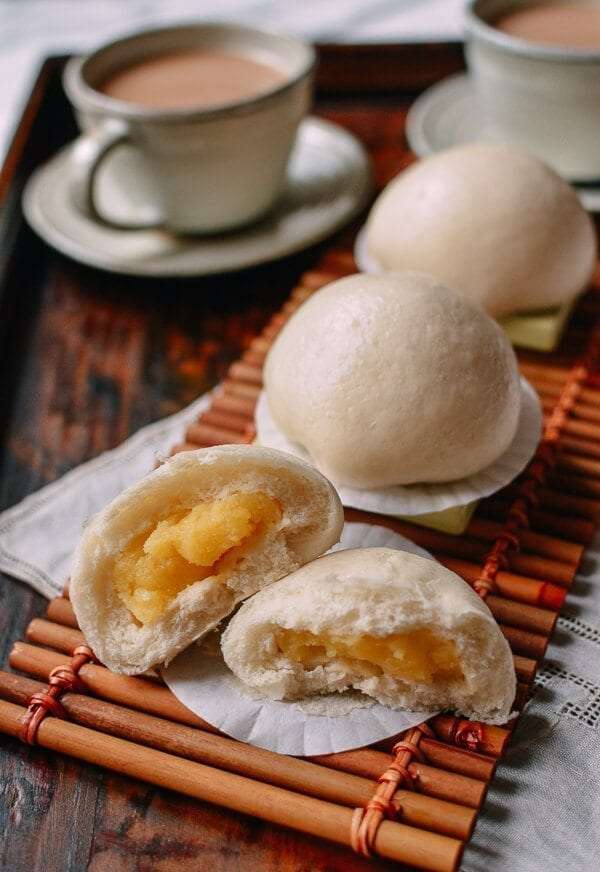
To create the custard, eggs and powdered sugar are beaten together, then combined with milk, heavy cream, flour, cornstarch, and milk powder for body. This mixture is cooked over simmering water with constant stirring to thicken evenly and prevent lumps, resulting in a smooth, rich filling. Melted butter enriches the custard further.
The dough is prepared with yeast, flour, powdered sugar, salt, coconut milk, and water, allowing fermentation to produce a light texture. The buns are filled with the custard and steamed to produce a soft exterior enclosing the creamy center. The contrast between fluffy bun and custard filling is a hallmark of this treat.
Cantonese Steamed Custard Buns are enjoyed fresh as sweet dim sum or dessert. The gentle steaming method preserves moisture while cooking the filling thoroughly. This preparation requires attention to stirring during custard cooking to ensure smoothness and proper thickness.
Ingredients
For the filling:
- 2 egg
- ½ cup powdered sugar (also known as confectioner's sugar or icing sugar, 60g)
- ¼ cup milk (60 ml)
- 3 tablespoons heavy cream (45 ml)
- 3 tablespoons all-purpose flour (25g)
- ¼ cup cornstarch (or wheat starch, 30g)
- ¼ cup milk powder 30g, dry
- 2 tablespoons butter 30g, melted
For the dough:
- 1 teaspoon yeast (2g)
- ¼ cup water warm
- 1½ cups all-purpose flour 235 grams
- 3 tablespoons powdered sugar (22g)
- ¼ teaspoon salt
- 3 tablespoons coconut milk (45 ml)
- 3 tablespoons milk (45 ml, added 1 tablespoon at a time; the quantity may vary depending on humidity)
Instructions
- Start by making the filling. Heat some water in a medium to large, deep pot. The water should be about 2 inches deep, and the pan should be large enough to accommodate the mixing bowl. Once the water boils, turn the heat to down to a simmer.
- In a large heatproof bowl or the metal mixing bowl that came with your stand mixer, add the eggs and powdered sugar. Beat for a minute on low. Next, add the milk and heavy cream, and beat for a few seconds to combine. Then sift in the flour, starch, and dried milk powder. Mix everything in until there are no lumps. Now add in the melted butter, and stir to combine.
- Next, carefully lower the mixing bowl into the pan of water, and begin stirring the mixture quickly and continuously. I used a stainless steel mixing bowl, so the egg mixture solidified rather quickly--it took about a minute. It’s essential that you stir quickly in this process. It may take longer if you use a thicker bowl. Once the egg mixture solidifies into a thick custard, remove from the heat. Do not overcook! Let it cool completely, and it’s ready to use.
- Cover the custard to prevent it from drying out while you make the dough. Note: If you’d like to make the filling a day or two early, store it in an air-tight container and refrigerate it.
- Now make the dough. In a large mixing bowl, dissolve the yeast in ¼ cup of warm water. Let sit for 10-15 minutes until you see yeast bubbles floating on top of the water.
- Now add in the flour, powdered sugar, salt, and coconut milk. Turn on the mixture with the dough hook attachment and set it to low, then slowly add in the regular milk, one tablespoon at a time until a dough is formed. A perfect dough should not stick to your hands or to the bowl--the texture should be smooth like a baby’s bottom!
- Cover the dough with a dry kitchen towel, and let it proof for 1 hour. I usually proof my dough in my microwave with the door closed and a mug of just-boiled water next to it. While the dough is proofing, let’s prepare a few things:
- Equally divide the egg custard filling into 12 pieces and roll them in your palms to form round balls. Cover them to prevent them from drying out. Prepare the steamer. With this recipe, we will start steaming with cold water, so there is no need to pre-boil the water. Cut out twelve 4"x4" pieces of parchment paper.
- The proofed dough should be about 2½-3 times its original size. Once the dough has finished proofing, put it back in the mixer and let it go for another 2-3 minutes to get rid of any air bubbles.
- Now, transfer the dough to a clean and lightly floured surface. With the help of your kitchen scale, equally divide the dough into 12 pieces, and cover with a dry kitchen towel while you assemble the buns. Take one dough ball, roll it out into a 4-inch disc, taking care to make sure the edges are slightly thinner than the center. Put a ball of custard filling on top, pleat, and close the top of the bun--see the video! Place it on a piece of pre-cut parchment paper, and set it on your steaming rack. Repeat until all of the buns are assembled.
- Put the buns in the steamer filled with warm water, covered with the lid (do not turn on the heat at this time). Let them sit and proof for another 30 minutes. After 30 minutes, turn the heat on and set it to medium. Set your timer for 12 minutes. During these 12 minutes, the medium heat will slowly bring the water to a boil and steam the buns. It may seem slow and lack action at the beginning, but trust me, the buns will be steamed nicely after just 12 minutes.
- VERY IMPORTANT NOTE!!! After the 12-minute timer (for steaming) goes off, set the timer for another 5 minutes and turn off the heat. DO NOT UNCOVER THE LID. The buns need about 5 minutes to cool and set or they will collapse, so be patient. They can only be revealed after the 5-minute timer goes off.
- Eat them while they are hot, just like you would if they were straight off the dim sum cart. You can also freeze the leftover buns in a zip-lock bag, and just re-steam when you want to have a bun for a rainy day!
Nutrition Information
Show DetailsNutrition Facts
Serving: 12Serving
Amount Per Serving
Calories 167 kcal
% Daily Value*
| Calories | 167kcal | 8% |
| Carbohydrates | 25g | 8% |
| Protein | 5g | 10% |
| Fat | 5g | 8% |
| Saturated Fat | 3g | 15% |
| Cholesterol | 39mg | 13% |
| Sodium | 97mg | 4% |
| Potassium | 104mg | 2% |
| Fiber | 1g | 4% |
| Sugar | 9g | 18% |
| Vitamin A | 225IU | 5% |
| Vitamin C | 0.2mg | 0% |
| Calcium | 52mg | 5% |
| Iron | 1.1mg | 6% |
* Percent Daily Values are based on a 2,000 calorie diet.
User Reviews
Overall Rating
4.5
You'll Also Love