Fruit Jelly
User Reviews
4.9
Fruit Jelly
Description
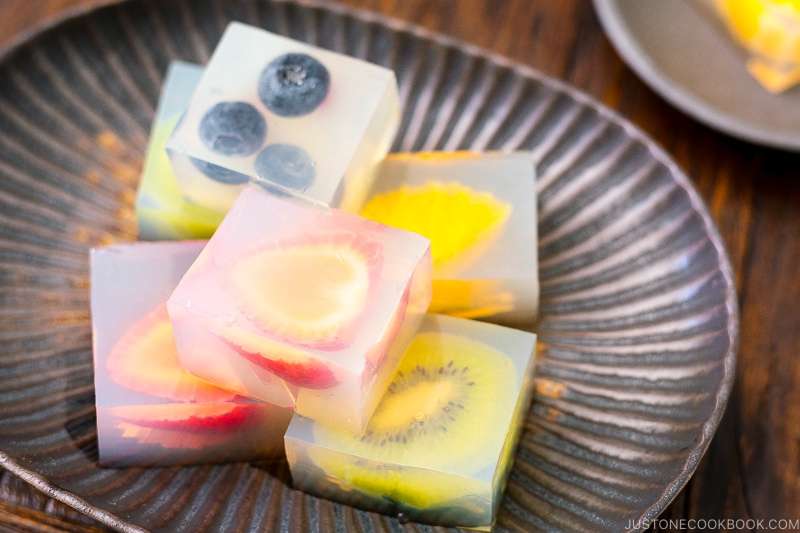
The Fruit Jelly recipe uses agar powder, a plant-based gelling agent, to create a clear, firm jelly base sweetened with sugar and set with fresh fruit pieces. The agar is dissolved and boiled briefly, then poured in a thin layer to cool and set partially before adding the fruit. The thickness of the fruit slices is made consistent to ensure an even set and appealing appearance. After setting, additional layers can be added to create a fruit-studded jelly dessert.
The jelly texture is firmer than traditional gelatin, with a smooth consistency that captures the fruit in suspended form without sogginess. This dessert provides a light, visually appealing way to enjoy fruit in a simple, elegant preparation.
It’s best served chilled and can be adapted with any preferred fresh fruit. Preparing the jelly layers carefully and removing bubbles helps achieve a clear, attractive finish.
Ingredients
- 2 cups water
- 4 g agar powder 1 package, 2 tsp, aka kanten
- ¼ cup sugar (4 Tbsp for “healthy“ and 6–8 Tbsp for “dessert;“ please read the post)
- Fruit oranges, strawberries, blueberries, and kiwi work well, of your choice
Instructions
- Gather all the ingredients. You will need a nagashikan (6 x 5.1 x 1.8 inches, 15 x 13 x 4.5 cm) or a similar-sized container lined with plastic wrap.
- In a small saucepan, add 2 cups water and 4 g kanten (agar) powder. Whisk to combine and bring it to a boil.
- Once boiling, lower the heat and cook for 2 minutes. Whisk occasionally and make sure the kanten powder has completely dissolved. After 2 minutes, remove from the heat.
- Add ¼ cup sugar and whisk until sugar is completely dissolved.
- Run water in the mold (or nagashikan) and pour the liquid until there is about ⅓ inch (8 mm) in the mold (so that the fruit won‘t touch the bottom). Using a spoon or toothpick, move the bubbles on the liquid to the corner and remove them. Let cool in the refrigerator for just under 10 minutes or at room temperature for a little longer time.
- Meanwhile, cut the fruits of your choice for the jelly.
- The thickness of the fruit should be about the same.
- When the bottom layer is slightly set (neither liquid nor completely set), place the fruits on top. If the bottom layer set too firm, the top layer will not attach to the bottom layer well and the fruit jelly will separate into the top and bottom layers when you cut. The liquid in the saucepan should not be solidified since the saucepan is still warm and it has more liquid in there. If solidified, then reheat until it turns to liquid.
- Then, pour the rest of the mixture in the mold. Pop and remove the bubbles. Keep in the fridge until the jelly has set completely.
To Serve
- Run a knife around the mold and gently flip and unmold the jelly. If you’re using the nagashikan, run a knife around the mold and pull up the handles.
- Cut the jelly around the fruit so they look prettier. Serve chilled on a plate.
To Store
- You can keep the jelly in an airtight container and store in the refrigerator for up to 2 days.
Nutrition Information
Show DetailsNutrition Facts
Serving: 9pieces
Amount Per Serving
Calories 26 kcal
% Daily Value*
| Calories | 26kcal | 1% |
| Carbohydrates | 7g | 2% |
| Protein | 1g | 2% |
| Fat | 1g | 2% |
| Saturated Fat | 1g | 5% |
| Sodium | 1mg | 0% |
| Potassium | 11mg | 0% |
| Fiber | 1g | 4% |
| Sugar | 6g | 12% |
| Vitamin A | 20IU | 0% |
| Vitamin C | 1mg | 1% |
| Calcium | 11mg | 1% |
| Iron | 1mg | 6% |
* Percent Daily Values are based on a 2,000 calorie diet.
User Reviews
Overall Rating
4.9
You'll Also Love